Learn essential Toast Web configurations for going live! Select the Getting Started button below to start this learning path.
Interested in adding Toast Payroll to your business? Click below to talk to a sales rep!
Getting Started With Toast Web Talk to a Sales Rep
In this Article:
In short, there's two ways to add an employee to Toast Web.
- You can create a simple profile with a POS access code and a job (containing permissions) so employees can clock in, clock out, and use Toast devices. This is the typical method used for hourly employees and is the method Toast Payroll uses when creating a mapped Toast Web profile for a new hire.
- Otherwise, you can create a profile with an account where an individual can log into Toast Web and view reports, change menus, and perform other back-end functions, all based on their permissions. An account is typically only created for owners, managers, admins, and anyone who will need access to back-end data.
- To learn more about the differences between a profile and an account, see Log in to Toast: Create an Account.
To add a new employee in Toast Web, follow these steps:
- In Toast Web, navigate to Employees > Employee management > Employees.
- Select the +Add New Employee button.
- If you're a Toast Payroll customer, you'll receive a pop-up indicating that it's best practice to add a new employee in Toast Payroll rather than in Toast Web. Once a Toast Payroll profile has been created, we will automatically create a corresponding Toast Web profile and we will map (sync) the two profiles together (see Toast Payroll: Manage Employee Mapping for more info). Select Add on Toast Payroll to continue.
- Selecting Add on Toast POS can still be used, but this is typically reserved only for individuals who need Toast Web (back-end) access but are not being paid through Toast Payroll. For instance, a bookkeeper or an accountant might use this method.
- For employees added on Toast Web (not Payroll), first you'll need to toggle whether you'd like this employee to have a Toast Web account (the Invite to create account toggle). A Toast Web account is necessary if the user needs to access the restaurant back-end, which may be the case for managers, owners, operating partners, accountants, or other individuals, but many standard staff members will not need a Toast Web account. Note: Any individuals who have been invited to create a Toast Web account will not be able to clock into the POS until they have accepted the invitation in their email inbox. This will result in an employee saying their POS access code (aka passcode or PIN number) doesn't work, so be considerate of timing when you select this option.
- If you need an employee to start clocking in to the POS and taking orders immediately, consider creating their profile without requiring Toast Web access, then returning to do this at a later time.
- If the employee only needs to clock in/out and use the POS, select No for the Invite to create account setting.
- If an employee has already been added and you need to grant them Toast Web access at a later time, check out the instructions in Grant or Remove Toast Web Access to Existing Employees.
- Next, enter the employee details. Different fields will appear depending on if a Toast Web account is being created or not. A few things to note:
- Email address - This field is required if the Invite to create account toggle is set to Yes for this employee. This is the email they will use to log in to Toast Web.
- Jobs and pay - Use the drop-down menu to select a job role from the list of configured options. Then enter a value into the wage field if the role selected is hourly. If your employee works multiple roles within the restaurant, select + Add new job to select an additional role from the drop-down menu. The new employee will receive all of the POS and Toast Web permissions associated with the job(s) they are assigned now.
- Name Fields - do not use emojis.
- When finished, select the checkbox next to Add another to repeat steps 3 and 4 for another employee profile, or select Add to save this profile.
After selecting Add, the individual will receive an email specifying their next steps, including creating a password if they were invited to create an account. A checkmark will appear next to their name under the Account Created column on the Employees page.
Note: If the employee's status remains Invited, they will not be able to clock in. Check whether the email invitation was received and accepted. If needed, resend the email invitation, verify their email address, or archive and recreate the profile to resolve the issue.
Back to top
All active employees will be listed on the Active tab of the Employees page, with the following labels in the Status column:
- Active: The employee has access to their POS and/or Toast Web account with the permissions configured for them.
- Invited: An email was sent with an invitation to create a Toast Web account. Invites expire after seven days.
- Importantly, employees with an Invited status cannot clock in and will not show up on your POS device until they accept the invite and activate their account. When they try to log in, they will receive an Invalid error.
- Expired: The employee received an email invitation to create a Toast Web account but did not accept the invitation within seven days. Select the Expired status to resend the email.
Inactive employees are listed on the Archived tab of the Employees page. See below for more details.
Back to top
Resend an Email Invitation
When an employee profile is created and Invite to create account was set to Yes, their status will show as Invited and an email is sent inviting the employee to set a password to gain Toast Web access. If this email was lost or misplaced, navigate to Employees > Employee management > Employees and select the Invited status icon to resend the email. These invitations expire after seven days, so if that time has passed, the invite will need to be resent using this process.
If the email is still not being received, verify the email address entered. Next, have the employee check their junk or spam folders. Then try archiving and unarchiving their existing job profile before resending the invitation.
Back to top
Edit an Employee Profile in Toast Web
| If you're a user of Toast Payroll, this newer layout will look familiar, so how do you know which system you're in and which profile you're looking at? The easiest way is to check the URL at the top of your web browser (does it say toasttab.com or payroll.toasttab.com?). |
- In Toast Web, navigate to Employees > Employee management > Employees. Once you select the employee's last name hyperlink, you'll see the employee's profile page.
- On the Overview tab, we have basic information, including the employee's status in Toast Web, their POS access code (the 4.9 Employee Info permission is required to view other users' POS access code), and the jobs they're assigned to. Select either the > arrow icons in the corner of the tiles or the tabs along the top of the employee profile to make changes.
- The jobs that appear at the bottom of the Overview tab are only for the location you're currently viewing in Toast Web.
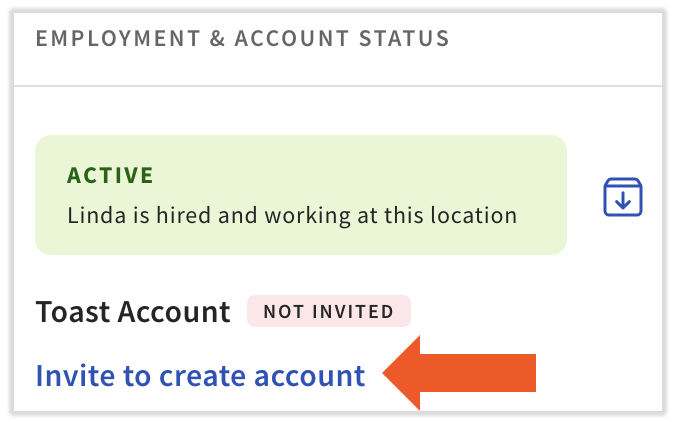
- In the Employment & Account Status tile, you may see a link to Invite to create account. This is used to offer an employee access to the MyToast employee app and Toast Web (if they're given the necessary permissions). An employee must have a valid email address to create an account.
- Selecting this link will open a sidebar. Verify the email address that's listed and select Save and invite to send the invitation via email. Important note: This employee will be unable to log into a Toast POS device until they accept their invitation and create their account password.
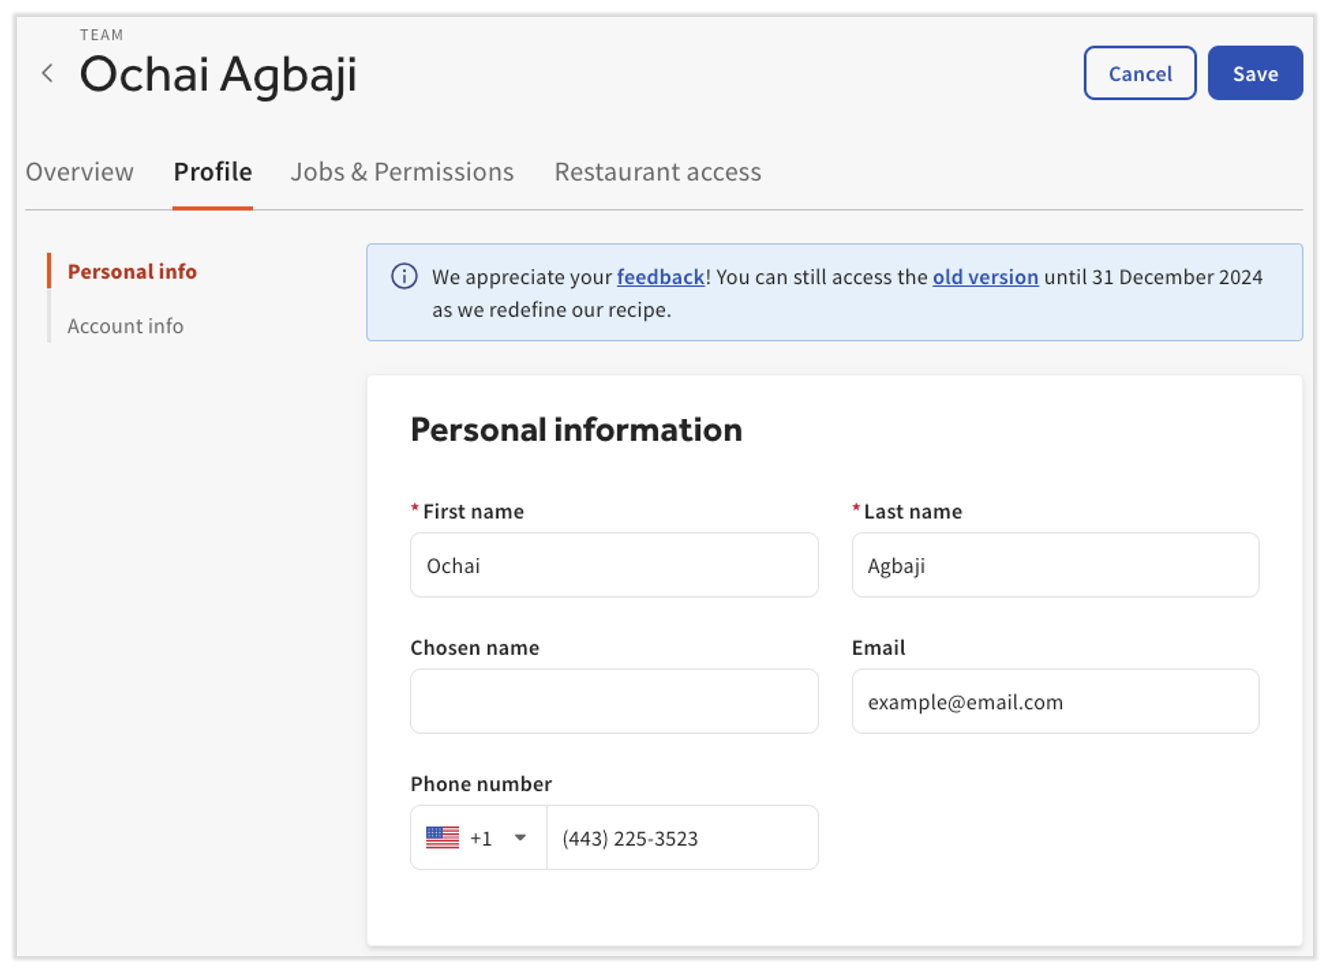
- The Profile tab allows you to make changes to an employee's name, chosen name, email address, or phone number. If you scroll down or select Account info on the left, you can also check or edit an employee's POS access code (passcode). Select Save at the top for any changes you make here.
- Name Fields - do not use emojis.
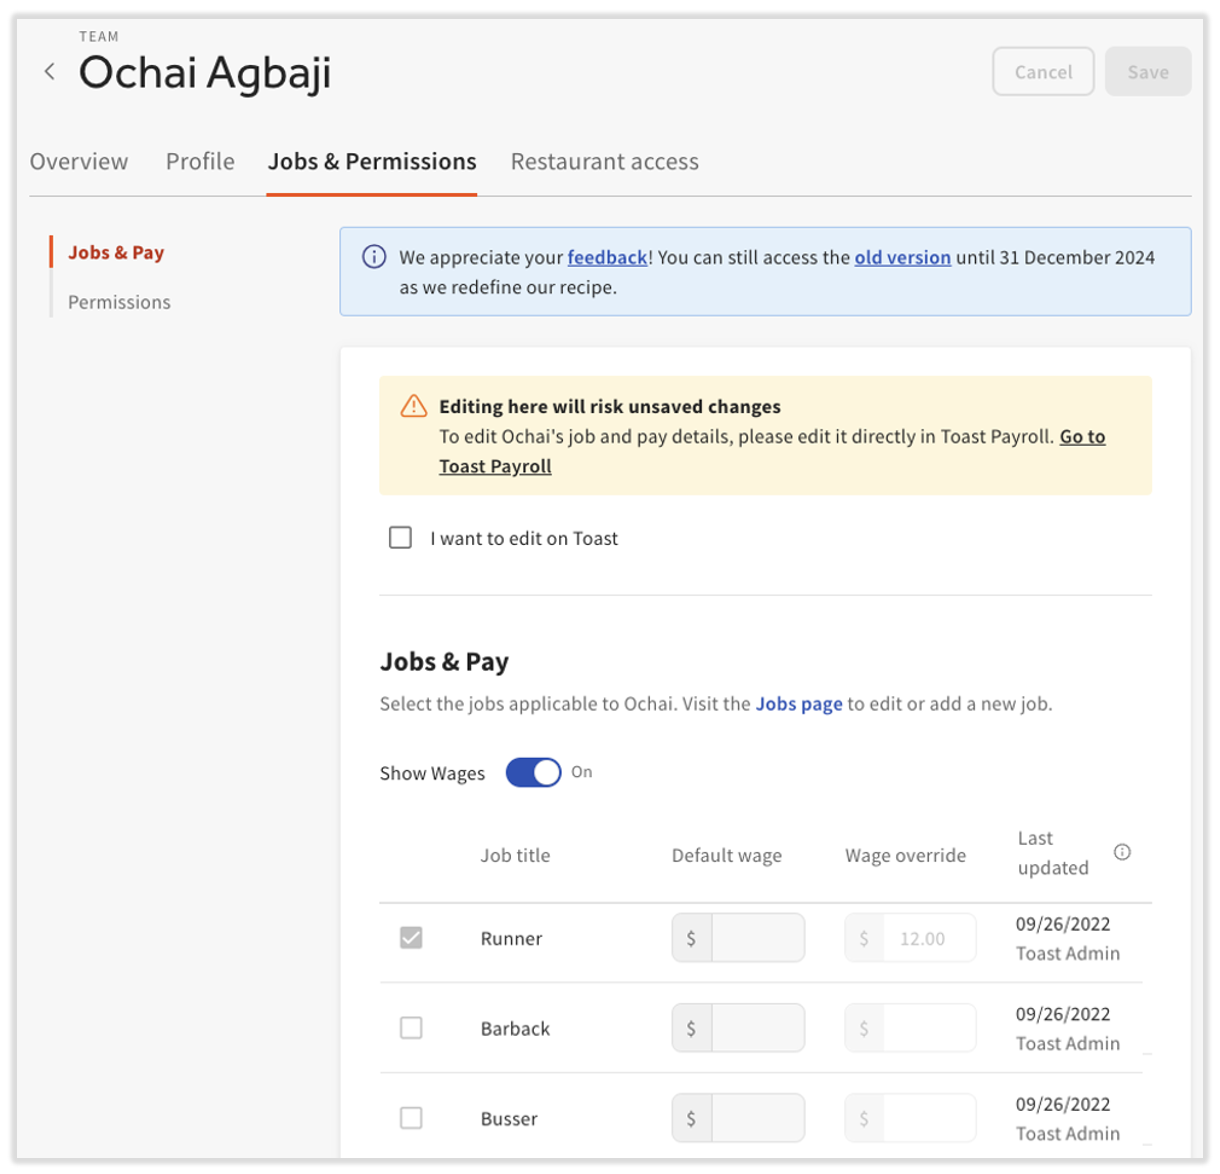
- The third tab, Jobs & Permissions, is where you can assign new jobs and permissions.
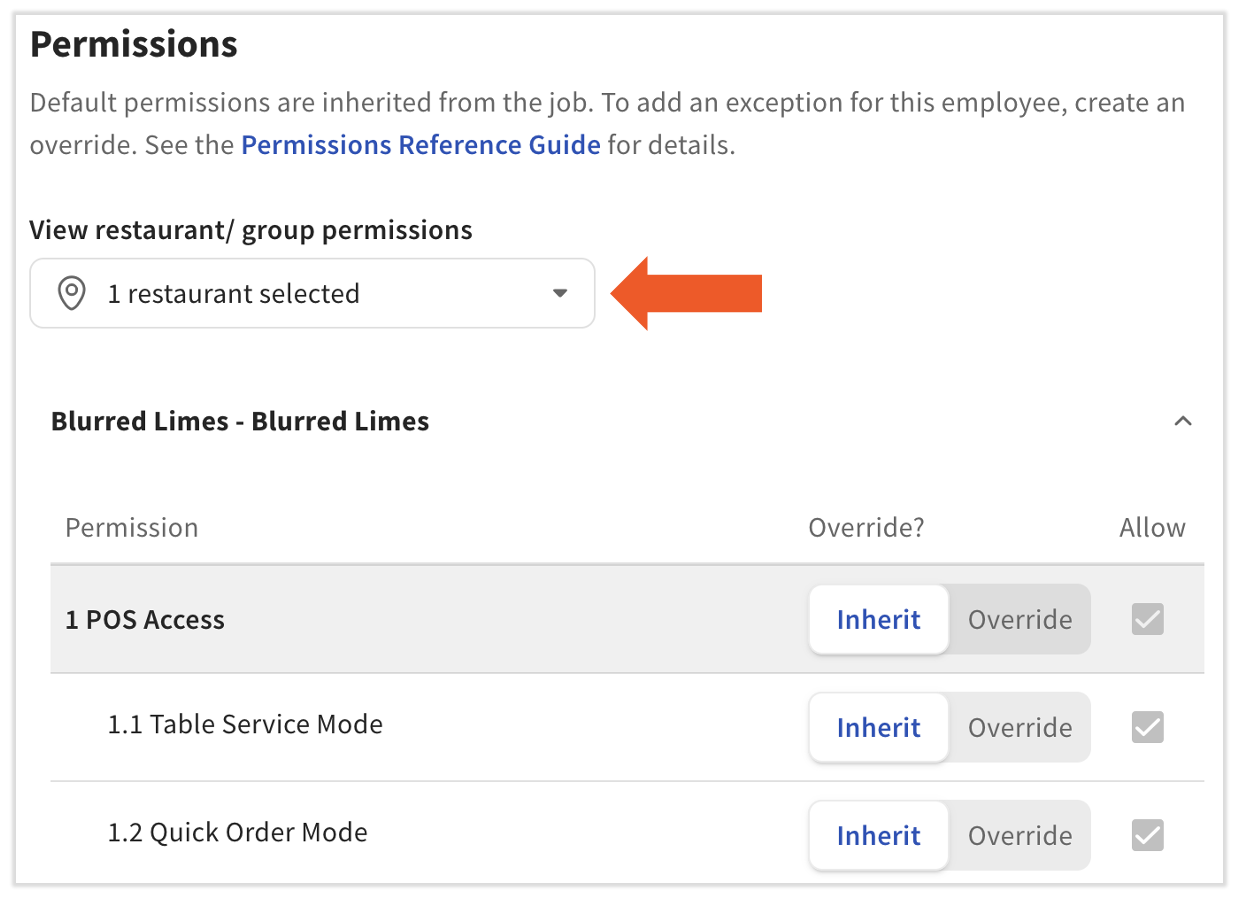
- While assigning permissions, you'll notice a drop-down menu called View restaurant/ group permissions if you have one or more locations. Make sure you're on the correct location(s) before assigning permissions. To give permissions to an employee at a location they don't have access to, you'll first select the Restaurant access tab at the top of the page to assign them to that location (see below for more information on this tab), then return to this page to assign the permissions.
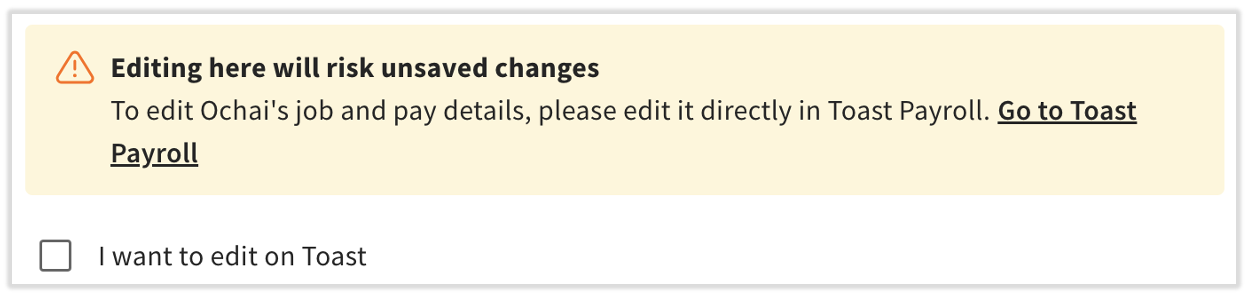
- One change users of Toast Payroll may notice is the yellow disclaimer banner at the top of the page. When this employee also has a Toast Payroll profile, it is strongly recommended to make job and pay changes in Toast Payroll in order to avoid syncing and saving issues (editing Toast Web and Toast POS permissions is still done further down on this page). Select Go to Toast Payroll to navigate to the Toast Payroll login screen. Otherwise, if you're sure, you may select the checkbox to directly edit this employee's job and pay information in Toast Web.
- On the Restaurant access tab, you can view the restaurant groups and locations an employee is assigned to. Select the Manage access drop-down menu to assign this user to more locations or restaurant groups. if an employee has a location assigned, but no permissions at that location, they will only be able to clock in at that location, so you may wish to visit the Jobs & Permissions tab after assigning an employee to a new location.

- After selecting Manage access, use the Restaurant groups and the Locations tabs at the top or for larger accounts, use the search bar to find a specific location.
- Lastly, the Pay history tab is only visible to users without Toast Payroll. Select it to discover the benefits of using Toast Payroll along with the existing labor data you have in Toast Web.
Back to top
Update Employee Information in Toast Web
To update employee information (name, chosen number, email address, phone number, and POS access code) in Toast Web, follow these steps:
- Navigate to Employees > Employee management > Employees. You'll need permission 4.9 Employee Info to be able to edit these fields.
- Select the employee's hyperlinked last name.
- The Overview tab is view-only, so select the Profile tab.
- Make any edits to this page and select Save.
- Name Fields - do not use emojis.
For more information on how employees can update the email address or password for their own account, see Log in to Toast: Update Your Account.
Back to top
Update Employee Permissions in Toast Web
As a reminder, permissions are commonly associated with the jobs an employee is assigned to. For instance, a bartending job will have a set of default permissions that a user inherits when they're assigned to that job. You may wish to edit the permissions of a job rather than editing an individual's own permissions. See the Update Job Wages and Permissions section of Create and Edit Jobs (Roles) for Toast POS to see how this is done.
It's a good idea to periodically review and update employee permissions to make sure that no jobs or employees have more more access than necessary for their position. Follow the steps below to make updates and overrides as needed to restrict sensitive actions to specific users (e.g. updating other employee information, accessing sensitive financial information, purchasing integrations, etc.).
To update an individual employee's permissions, follow these steps:
- Navigate to Employees > Employee management > Employees. You'll need permissions 8.2 User Permissions, 4.10 Employee Jobs & Wages, and you must have ALL the same (or more) permissions as the user you're trying to edit.
- Select the employee's edit pencil on the right side.
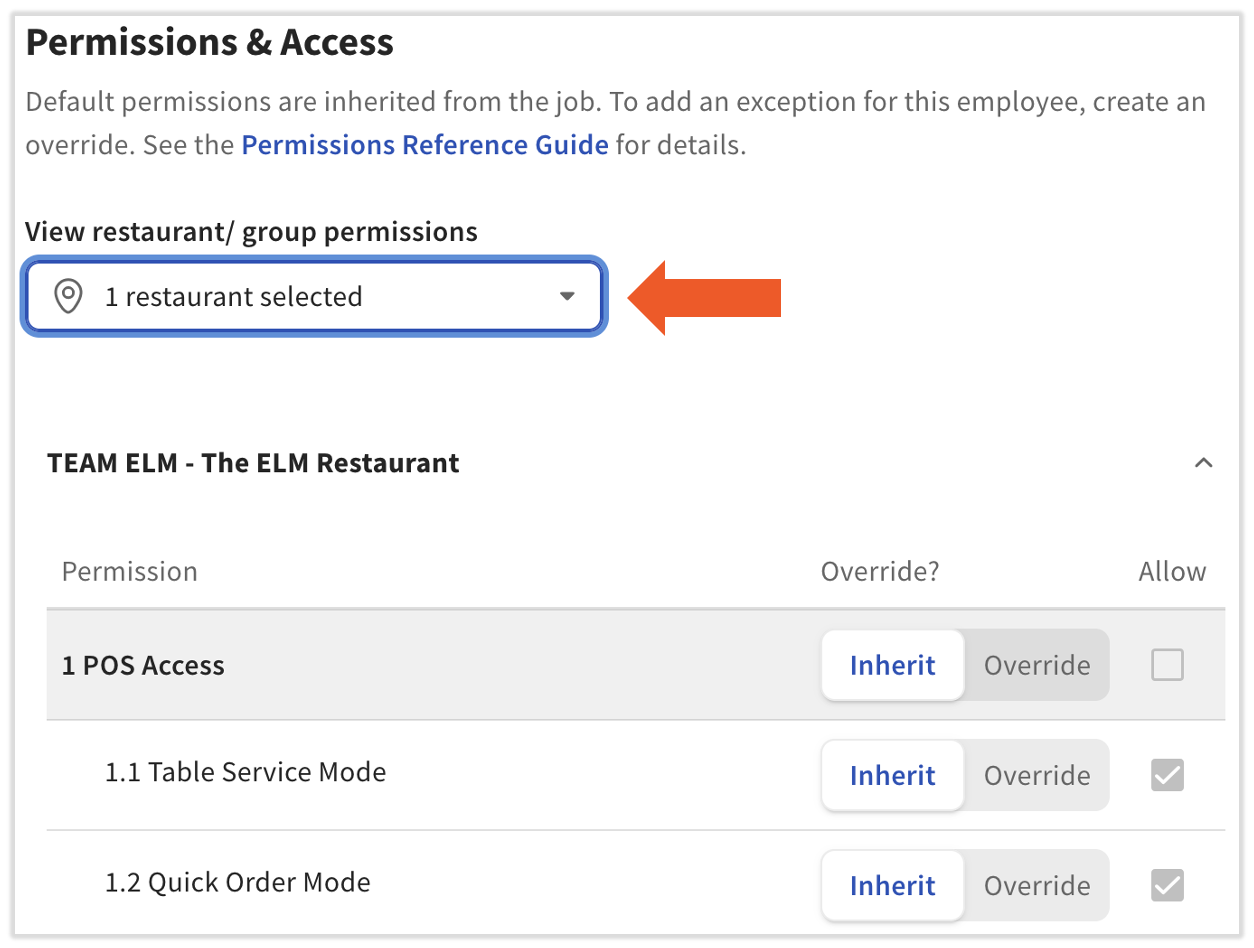
- You'll land on the Jobs & Permissions tab, so scroll down to see the Permissions & Access tile.
- If applicable, make sure you have the appropriate restaurant or restaurant group selected. Permissions & Access tile with the View restaurant/ group permissions drop-down menu highlighted
- In order to check a permissions box on this page, you will first need to toggle the slider to Override, then select the box. Once the permissions are set correctly, select Save. When using the "Override" setting for group permissions, it ensures employees are granted only specific permissions rather than inheriting defaults. This approach is particularly useful for tasks like managing sensitive configurations such as menu changes or online ordering modifications.
Back to top
Update Employee Jobs in Toast Web
To update an employee's job or role in Toast Web, follow these steps:
- Navigate to Employees > Employee management > Employees. You'll need permission 4.10 Employee Jobs & Wages to edit an employee's job.
- Locate the employee and select the edit pencil to the right of their name.
- If you use Toast Payroll, you will be greeted with a disclaimer. It is vital to update job and wage information in Toast Payroll for syncing and mapping purposes. A wage edit on this page will not be reflected in Toast Payroll and a job edit on this page will cause timesheet syncing errors in Toast Payroll. You must select I want to edit on Toast to make direct changes to this page.
- Select the checkbox for a job you want to add or remove for this employee. Select Save once you're finished.
Back to top
Update Employee Wages in Toast Web
| As a reminder, wages are commonly associated with the job(s) an employee is assigned to rather than the individual themselves. For instance, a bartender job will typically have a default wage that the employee inherits when they're assigned the bartender job, so for most cases, we recommend editing the wage of a job rather than overriding an individual's wage rate. See the Update Job Wages and Permissions section of Create and Edit Jobs (Roles) for Toast POS to see how this is done. |
To override/update an individual employee's wage for a specific job, follow these steps:
- Navigate to Employees > Employee management > Employees. You'll need permission 4.10 Employee Jobs & Wages to edit an employee's job.
- Locate the employee and select the edit pencil to the right of their name.
- If you use Toast Payroll, you will be greeted with a disclaimer. It is vital to update job and wage information in Toast Payroll for syncing and mapping purposes. A wage edit on this page will not be reflected in Toast Payroll, and a job edit on this page will cause timesheet syncing errors in Toast Payroll. You must select I want to edit on Toast to make direct changes to this page.
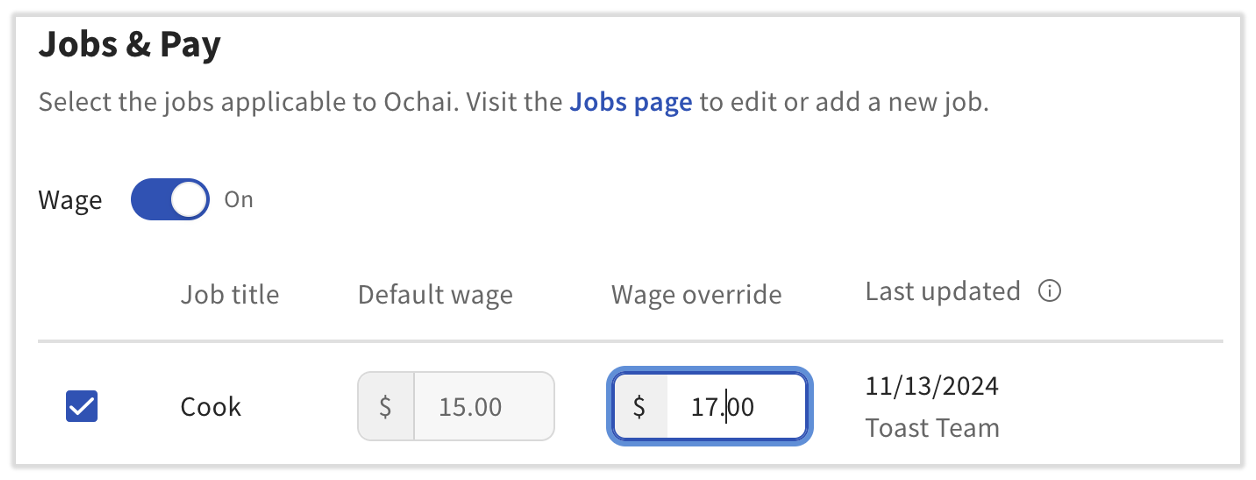
- For any jobs this employee is currently assigned to, you can add or change the value in the Wage override box. The Wage toggle must be set to On to see Default wages and Wage overrides. Select Save to save your changes.
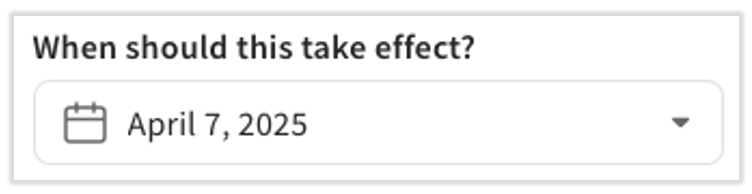
- If you would like to set this wage override to a date in the future, scroll to the bottom of this Jobs & Pay tile and select the drop-down menu for When should this take effect? Choose your date and Save. This drop-down menu only becomes active once a wage override is set.
- The only way to set this date in the future is to make the change to the job's wage (affecting all employees with that job). Wage changes for individuals cannot be set in the future without Toast Payroll.
Back to top
Archiving an employee removes them from your active employee list, effectively deactivating them. They can no longer log into Toast Web or Toast devices, but will still be visible in labor reports for historical reporting. Any user that archives or restores an employee must have the 4.9 Employee Info permission to complete their task.
Need to "uninvite" an employee from Toast Web? If you created an employee account with back-end access but you want to prevent them from accessing Toast Web, follow the instructions to archive their account. You can then recreate their account without adding an email address if you don't want them to have access to Toast Web.
Alternatively, if you want to restrict back-end access after account creation, you can change the associated email address to a placeholder email address. This removes an employee's ability to log in to Toast Web access unintended areas while preserving their employee profile (and their POS access if they have it).
|
If you use Toast Payroll, use the steps in Terminate or Archive an Employee in Toast Web or Toast Payroll to remove/terminate an employee in both Toast Web and Toast Payroll. When you have Toast Payroll, the only typical reason to archive an employee in Toast Web alone is if an employee has duplicate Toast Web profiles.
|
To deactivate an employee by archiving their profile, follow these steps:
- Navigate to Employees > Employee management > Employees.
- Locate the individual you wish to archive, and select the archive button (down arrow) on the far right side of the table.
- From the pop-up, select Archive to confirm this action.
If you receive an error message when trying to archive an employee, it may be because you're attempting to select your restaurant's primary user. To request a change to your primary user, the owner or restaurant admin should contact Customer Care.
Back to top
Archived Employees on Toast Web Reports
It's important to note that archived employees with hours worked will continue to appear on reports f they fall within the date range selected, but are not available on the employee filter options. If you want to be able to use the employee filter to search for a person by name, you can temporarily unarchive that employee and view the report.
If you navigate to the Time Entry Management report (Reports > Employee performance > Time entry management) and filter the report to your desired dates, you'll see time entries for all employees, including archived ones.
Archived employee timesheets also still appear in the Timesheets report. Timesheets are also editable. The Tips Management report also shows archived employees' information and still sends it to Toast Payroll (Note, though, that this would result in an error if the archived employee in Toast Payroll was also terminated, which is typical).
Back to top
Archived employees may be re-activated to restore their access to the POS and Toast Web.
- Navigate to Employees > Employee management > Employees.
- Select the Archived tab near the top of the page.

- Locate the employee you wish to restore, and select the unarchive button (up arrow) on the far right side of the table
- On the pop-up, select Confirm to restore this employee.
Back to top
As a manager, you may want to generate and export a list of active employees to make managing labor and payroll easier. Select the Export all employees button from the main Employees page to automatically generate a .csv file including employee names, contact information, assigned jobs, passcode, and more.
Back to top
Additional Resources
Back to top

