Learn essential Toast Web configurations for going live! Select the button below to start this learning path.
Getting Started With Toast Web
In this Article:
By default, restaurants will have three standard discounts:
- Comp (100%) check
- Comp (100%) item
- Open item dollar amount
To add a new discount:
- In Toast Web, navigate to Payments > Comps and promos > Discounts and promo codes.
- Select + Add a Discount.
- Name your discount. This name will be visible on your POS and guest receipt.
- Select your desired discount type, applicable dining options, value, and usage rules (Applies to) on the discount details page. Discount types are described in more detail in this article.
- If you intend to apply the discount to a specific item and/or group, select "Specific item/group" and enter the item/group name or number in the Items search bar. Once item/group numbers are entered, a new set of identifying numbers will be shown.
- To ensure that you're adding the correct menu item/group, you can:
- Enter the menu item/group name as it appears on your menu OR
- Enter the menu/item group number as it appears on your menu. You can retrieve this information from the Menu details page.
- Note: You are able to select multiple dining options per discount. For example, you could choose solely dine-in, or takeout and delivery, or all available dining options, depending on how you'd prefer the discount be available to your guests.
- In the Advanced Settings section, you can give your discount a "Point of Sale (POS)" Name if you would like this to differ from the discount name provided on the guest receipt, select a button color, and assign permission levels (to decide if any user can enter the discount, or whether a manager code is needed).
- Note: Button colors can be used to group similar discounts, differentiate between employee and guest discounts, or distinguish discounts that need manager approval.
- Save and publish your changes.
The discount will default to active. You can deactivate and reactivate discounts from the Discounts page.
Note:
- Discounts will only work on the new kiosk experience via promo codes, so be sure to set up a promo code if you'd like guests to benefit when using a kiosk operating on kiosk. If you'd like to configure an item discount for online ordering, we suggest using time-specific pricing.
- Guests who are using Toast Mobile Order & Pay® have the ability to input and utilize promo codes during checkout.
Back to top
All discounts configured in Toast adjust the price of an item, then tax is recalculated based on the new price of that item. In some instances, you may need a post-tax discount so you can collect taxes on the original full price of the item. To do this, you must create an Other payment option with the Treat as Discount setting set to Yes.
For more information and instructions on making other payment options, please read Set Up Other Payment Options.
Back to top
- Fixed discounts are a set dollar or percentage amount that is to be deducted from a check or item. See Create a Fixed Discount to learn more.
- Open discounts allow users to enter either a dollar or percentage amount of their choosing when discounting an item or check. See Create an Open Discount to learn more.
- Combo discounts can be used to designate multiple items into one set price or to assign a single item a specific dollar value. See Create a Combo Discount to learn more.
- BOGO (Buy One Get One) discounts can be configured to either “buy one” or “buy multiple things” in order to “get one” at a specific dollar or percentage discount. See Create a BOGO (Buy One Get One) Discount to learn more.
Back to top
Customize your discounts to be available for specific days or times.
- Navigate to Payments > Comps and promos > Discounts and promo codes.
- Select an existing discount you'd like to edit or select + Add a Discount to make a new one.
- Expand the Availability settings to set time restrictions on your discounts. You can customize the following:
- Date range
- Days of the week
- Time of day (Select + Add hours to add additional time ranges)
- Note: Each discount can be assigned to only one date range. For example, you cannot have a discount for both January 1-5 and 15-20. You can, however, set a discount to be available every Tuesday in January from 10 a.m. - 12:00 p.m. and again from 5:00 p.m. - 8:00 p.m
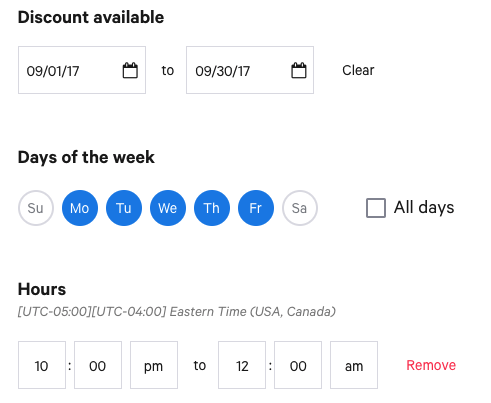
- The screenshot above shows a discount that is available on all weekdays in September from 10 p.m. - 12 a.m.
- Note: If the time is outside of a discount's availability, the button will not be available on the POS.
- When finished, be sure to save and publish your changes.
Back to top
Discount rules can be added in the Advanced Settings section of a discount's details page.
Minimum or maximum rules can be applied to either item-level or check-level discounts. This is used to require a minimum or maximum value to a certain check or item before it can be discounted.
Examples include:
- You must spend $30 to get a free slice of pizza.
- You can't get a 50% employee discount on a check that is over $50.
BOGO and fixed item-level discounts (e.g. $5.00 off nachos) can be configured to automatically apply to an order. If the check meets all the necessary conditions, the discount will be applied once a user selects send, stay, hold, or pay. Select the Auto apply discount setting in order to enable this behavior.
Rules for auto-apply:
- This will not function for manager-only approved discounts. Auto-apply must be assigned a permission level to any user. This means that any user can apply the discount.
- This will not function for discounts using promo codes. If there is a promo code attached, auto-apply will not work.
- Auto-apply can only be configured for item-level discounts. A discount set to Entire check will not provide this option.
Note:
- At this time, discounts and promo codes cannot be applied to third-party partners.
- Please be advised that only one promo code or discount can be applied to a check.
Back to top
You can apply discount reasons to a discount to easily track why discounts are being used in your restaurant.
Back to top
To create and assign discount reasons, follow the steps below.
- Navigate to Payments > Comps and promos > Discount and food waste reasons.
- Select + Add Discount Reason.
- Enter a Name and a Description for the reason.
- The Active and Waste settings will be toggled on by default. Be sure to toggle Waste to the off position since this discount isn't intended for tracking food waste.
- Save and publish when you're done.
Back to top
To assign discount reasons to a discount, follow the steps below.
- Navigate to Payments > Comps and promos > Discounts and promo codes.
- Select the edit pencil next to the discount for which you'd like to assign discount reasons.
- Expand the Advanced Settings section.
- For the Discount Reasons setting, select + Assign Reason.
- Use the checkboxes to select which reasons you want to be associated with this discount. Then select Save.
- Once you have discount reasons assigned to this discount, you'll see the Prompt discount reasons on POS settings. If this checkbox is selected, users will be asked to choose a discount reason every time this discount is applied.
- If you always want a reason applied when this discount is used, select the Discount reason required setting.
- If you always want a comment entered when applying a discount reason, check the Comment required setting.
- When you've finished, be sure to save and publish your changes.
Back to top
To use discount reasons on your Toast device, follow the steps below.
- Select the discount you wish to apply.
- If discount reasons have been added to the discount, you'll be prompted to select why you're applying the discount. If the discount reasons are configured as optional, a No reason button will be visible.
- If comments are enabled, you'll then be prompted to add additional comments as to why the discount was selected. This field may or may not be optional.
Back to top
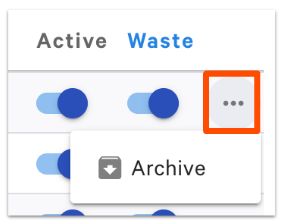
To deactivate or archive a discount reason, go to the discount reasons page (Payments > Comps and promos > Discount and food waste reasons), use the Active toggle to activate/deactivate a discount reason. The blue toggle with the circle to the right means the reason is activated. To Archive a reason, select the three-dot overflow menu to the right of the blue toggle and choose Archive.
Back to top
To apply multiple discounts to a single check, you'll need to adjust the settings in that discount's Advanced Properties section.
- Navigate to Payments > Comps and promos > Discounts and promo codes.
- Select the edit pencil next to the discount you'd like to edit.
- Expand the Advanced Properties settings at the bottom of the page.
- Select the checkbox under the Allow with other discounts setting.
- Note: This setting will only be available if the discount type is set to fixed check, open check, or BOGO. Item discounts will not be able to be combined.
- Save and publish.
You are now able to combine multiple discounts on a single check.
Back to top
If you have the Consolidate Menu Items setting selected under your UI Options, you can utilize the Consolidate Discounts setting to allow multiple discounts stacked on one line item.
For example, all draft beer has a $2 discount on Tuesdays. If a guest orders two beers and you have the Consolidate Menu Items and Consolidate Discounts settings turned on, both beers will be listed as one line item on the check with a single $4 discount applied to the line item ($2 discount x quantity of two items consolidated into one line). If you do not have the Consolidate Discounts setting selected, but do have Consolidate Menu Items turned on, you would still have one line for both beers on your receipt, however the discount would only equal $2 as the discount is applied per line item.
Note: Consolidate Discounts ONLY works with fixed currency discounts at this time. All other discount types will need to have the Consolidate Menu Items setting turned off if the discount can apply to multiple quantities of the same item on the check.
Back to top
When restaurants have several active discounts at a time, it can be time-consuming to scroll through discounts to find the applicable button for a diner's coupon. Entering a promo code is a helpful alternative that automatically applies the associated discount to an item or check without having to search through discount buttons.
Back to top
To add a promo code to a discount, follow the steps below.
- Navigate to Payments > Comps and promos > Discounts and promo codes.
- Select the edit pencil next to the discount you'd like to edit, or select + Add a Discount.
- Scroll down to the Promo Codes section at the bottom of the screen. Select the + Add Promo Code button.
- Enter a promo code into the Code field using letters and/or numerical digits. If you intend to use a barcode scanner to activate a discount, simply enter the barcode into the Code field instead.
- Next, add a description of your promo code.
- Check off Single-use if this promo code can only be used once per guest. Single-use codes can be used on the POS or through online ordering and are tracked by customer phone number.
- Optional: Add a Start Date and End Date to your promo code if applicable. This would allow you to set an eligible time period for the promo code to be used, but is not required.
- Note: Both a Start and End date must be selected for the eligibility period to apply. If all promo codes on a discount are ineligible based on their start and end dates, the discount cannot be applied.
- Once you're finished entering the corresponding information for your promo code, save and publish your changes.
- When adding promo codes on a discount, be sure your start and end dates don't conflict with the discount's scheduled availability dates. In addition, if you'd like your promo code to be eligible for one day only, make sure the start and end dates have the same date selected.
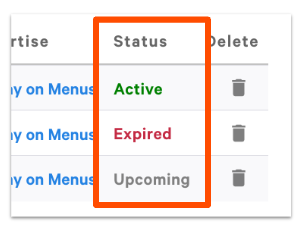
- To remove the start and end dates for a promo code, select Clear Date. The status of the promo code will also be displayed to keep track of which promo codes are Expired, Upcoming or Active based on the date range selected.
- Note: Promo codes are supported in Toast Online Ordering for select discount types that do not auto-apply, do not require manager approval, and do not contain an open discount value. For a complete list of discounts that can be applied via promo code online, visit Supported Discounts for Online Ordering.
Back to top
To configure promo code search, follow the steps below.
- Navigate to Front of house > Order screen setup > UI options.
- Scroll down to Enable Promo Code Search setting and select Yes.
- Save and publish your changes.
Back to top
To add a promo code to an item or an open check on your Toast device, follow the steps below.
- Select the three dots in the upper right corner and select Promo Code.

- When prompted, enter the promo code into the text box and select Apply Code. If a non-manager enters a promo code for a manager passcode-required discount, they'll be prompted for a manager passcode after selecting Apply Code. The manager must have the 3.1 Discounts permission granted to them in order for their passcode to be valid.
- The promo code will apply its associated discount to the eligible check item or item.
Back to top
If a check-level promo code uses a barcode, select Discount, choose the applicable discount, and scan the barcode. If the promo barcode is attached to a specific item, select the line item and scan the barcode. A promotional discount will be applied.
Toast does not create QR codes for discounts, but QR code or barcode values can be entered into the Code field when configuring the promo code in Toast Web (see step 4 of Add a Promo Code to a Discount).
Note: The USB scanner acts as a physical keyboard. To enable this peripheral on the device, navigate to Android Settings and select Language & Input. Under Keyboard & Input Methods, select Default and turn OFF the setting for hardware (physical keyboard).
Back to top
End a Promo
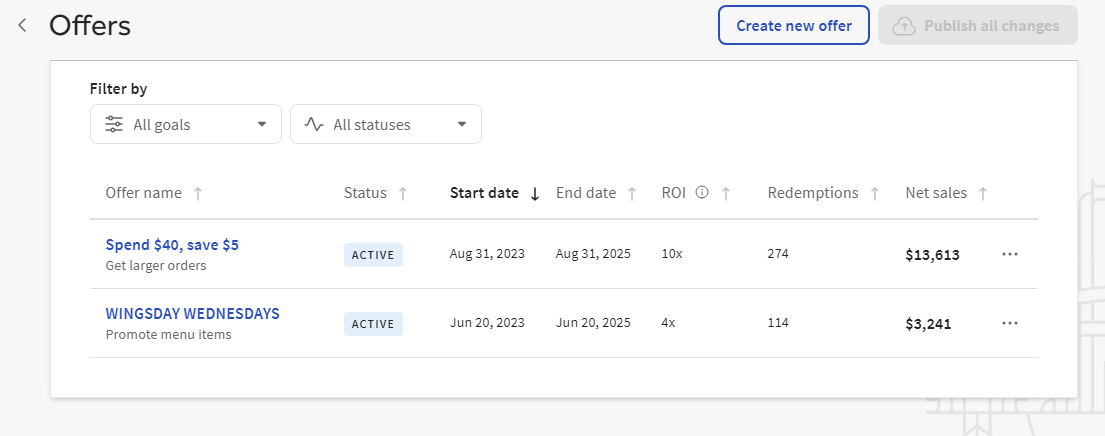
If you want to stop/discontinue a promo code, navigate to the Offers page in Toast Web and select the three horizontal dots where you'll be able to Complete or Archive them.
Back to top
Back to top

