In this Article:
Kitchen Configuration Overview
Features such as prep stations, courses, expediters, and ticket details can all be configured in Toast Web. Select Kitchen on the left-hand navigation menu, and then navigate to one of the following pages to get started:
- Printers, tickets, & kitchen display systems (KDS) > Kitchen - Set up kitchen displays, prep station and expediter printers, and the information displayed on your tickets.
- Kitchen stations > Prep stations - Create and configure your prep stations.
- Pacing > Courses - Create and manage courses.
Back to top
Basic KDS Navigation
The video below will cover basic KDS navigation, including All Day View, Show Recently Fulfilled, the Recall button, Production Item Count, Grid View, and KDS Offline Mode.
Below are some important features to note when navigating your KDS, as covered in the video.
When an order is placed, tickets will appear on the KDS. You can scroll from left to right to view the open tickets and tap a ticket to fulfill an entire order or a specific item in the order. Tickets will show in order of when they were fired, with the oldest tickets on the left and the newest on the right. You can set your KDS as a prep station or an expediter within Device Settings. You can change these at any time.
KDS that are configured to be expediters will see the entire order on a ticket, and KDS that are set to prep stations will only see items on tickets that pertain to that prep station.
On the top right of the KDS screen, you will see four buttons. These buttons provide more information and options on your KDS:
- All Day View- When you select Show All Day View - your screen will change to show you how many specific items need to be prepared. All Day View makes it easy to see a condensed list of totaled menu items without searching through every ticket to see what can be made at the same time. To go back to the ticket view, select Hide All Day View. You can always toggle back and forth.
- Show Recently Fulfilled -The Show Recently Fulfilled button will display tickets that you recently fulfilled to make it easy to see what’s been completed already and unfulfill those tickets if needed. These tickets are in green and will always be on your screen's left. Select Hide Recently Fulfilled to remove these tickets.
- Recall - The Recall button will re-open the last ticket you fulfilled. This is helpful if, say, you accidentally bump into a ticket that isn’t ready yet. Recalled tickets will say RECALLED in red at the top. You can recall multiple tickets by tapping the button multiple times.
- Device Settings - The three-dot icon in the top right corner allows you to select different configuration options on that specific device, like how tickets are displayed, which tickets are displayed, and whether this device is an Expediter or Prep Station through Device Setup.
Here are a few more high-level settings on your KDS:
Production Item Count- Whereas All Day View summarizes orders at the item level, Production Item Count summarizes at the ingredient level. This helps cooks know at a glance how many of each ingredient is needed to fulfill all of the active orders at any given moment. This ensures that high volumes of orders can be fulfilled quickly without taking time to read through a bunch of KDS tickets. For example, if there are five active orders for Double Cheeseburgers, the Production Item Count would show 10 Burger Patties.
- To see Production Items on your KDS, you will need to first need to configure these settings in Toast Web and then after that, enable which ones you want to track on your KDS. To learn how to do this, check out the article Production Item Count.
Grid View- Grid View is Toast's KDS view designed to optimize the kitchen for speed and efficiency. This view features a fixed, configurable grid layout and the ability for the kitchen to preview incoming orders before they are finalized.
Offline Mode - In the event of a Toast or internet outage, your KDS can still receive in-store orders. Through your local area network, Your staff can continue service as usual. Online orders cannot be received when there is an internet or Toast outage.
Back to top
There are a few settings under the Printed Tickets and Ticket Screens header that are key for ticket routing and printing. Including:
Individual Tickets for Every Item in an Order: This settings group consists of options for both your printers and KDS. You can configure them to operate identically, or independently from each other. To learn more, see Get Started with Kitchen Ticket Display Customization.
Item Sorting Priority: This setting allows a restaurant to select how they would like the items sorted in a ticket. The options are as follows:
- By seat number, sort items sequentially by assigned seat numbers (Seat Number must be enabled in UI Options)
- By sort order, sort items by the assigned sort order (Sort Order must be assigned in Advanced Properties)
- Neither. Sort items by input order.
To learn more about how item sorting priority works, check out this Toast Central article: Manage Item Sorting Priority for Kitchen Tickets.
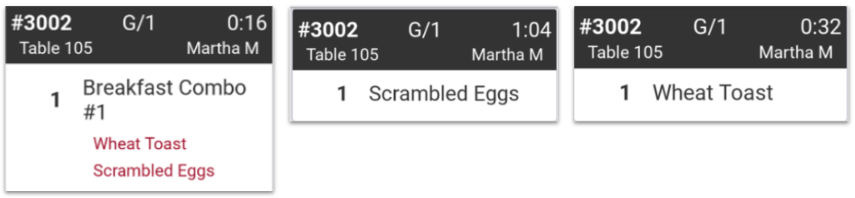
Modifier Routing: This feature allows you to send modifiers to specific prep stations without their parent item. This can make it easier for employees to read tickets and get the info they need right away. The options are as follows:
- Print or show modifier(s) only
- Print or show item with modifier(s)
For example, if you have a "Breakfast Combo #1" on your menu that comes with a style of eggs, a choice of meat, and a type of toast, you can route these modifiers directly to specific prep stations.The eggs would show up at the prep station as "Scrambled Eggs" without the parent item ("Breakfast Combo #1") showing up on the ticket.
Note: Further steps will need to be completed depending on what modifiers you want to be routed and to what prep stations you'd like them routed to. To learn more about this, see this Toast Central Article: Route Kitchen Tickets by Modifier.
Back to top
The settings in the Expediter section can be used to create consolidated tickets for items that are tagged with multiple prep stations. All of your configured printers will appear as expediter options.
- If you use printers as the expo station, select the appropriate printer from the checklist, and then select Always print expediter tickets for the Printing Mode setting.
- If you are using a KDS device as an expediter, then make sure to set it as an expediter directly in your device under Device Setup on your KDS device.
To learn more about two-level fulfillment, check out this Toast Central article, Configure Two-Level Fulfillment on your KDS.
Back to top
In this section, you'll be able to determine how your kitchen’s printed tickets will be configured. You'll be able to determine the following settings:
- Print Guest Details: Enable this option if you need all guest details (name, address, phone number) included on delivery and takeout orders. Guest details will not appear on dine-in orders.
- Print Default Modifiers Black: Specify whether you'd like to print default modifiers in black instead of red when printing in vertical mode.
- Print Ticket Changes: Specify if ticket item modifications (such as the "Special Instructions" field/order notes) and/or voids are sent to kitchen printers.
- Print Item Sizes Inline: Determine whether you'd like sizes (if you're using size pricing in your menu) to print on the same line as the item or below it.
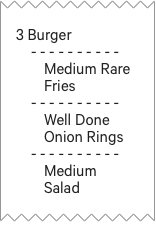
- Group by Plate: Once enabled, this feature will group identical items together on one printed ticket. Modifiers (for each plate) will follow in groups separated by dashed lines. See the examples below.
|
Group by Plate Enabled
|
Group by Plate Not Enabled
|
 |
|
- Split Tickets by Course: If your restaurant uses coursing (detailed below), there is the option to have separate tickets print by course.
- Header/Footer Spacing: Determine the spacing for the header and footer on a kitchen ticket.
- Ticket Footer: Select optional information to be included in the ticket footer such as Count of Tickets, Scheduled Order Due Time, and Payment Status. You'll also be able to check off whether you'd like the footer included in prep station tickets and/or expediter tickets.
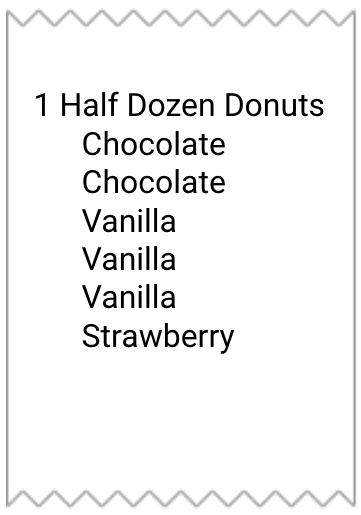
Note: There are additional modifier display settings to configure in the UI options page in Toast Web (Front of house > Order screen setup > UI options) including Modifier Display Mode and Consolidated Modifiers (image below).
|
Consolidated Modifiers Enabled
|
Consolidated Modifiers Not Enabled
|
|
|
Back to top
The ticket screen settings provide you the flexibility to modify how tickets appear on the KDS device. These options may be helpful for waitstaff and cooks to keep track of order time, new tickets, and changes to current tickets. This section includes the following settings:
- Recently Fulfilled Timeframe: Choose the number of minutes you'd like fulfilled tickets to be available for review on the KDS.
- Warning Colors: Enable this option to create different time thresholds for order prep. This may be helpful for waitstaff and cooks to quickly identify how long tickets and items have been unfulfilled as the ticket color changes.
- Ticket colors by dining behavior: Enable a dining behavior and set a color to easily identify which orders are for "here" and which are "to-go". The color will appear as a border around your kitchen tickets.
Note: To help you and your staff keep track of the warning colors and dining behavior colors you've selected for your restaurant, you can use our downloadable Ticket Color Guide:
- Print On Demand: Enable this option to allow kitchen staff to print delivery or takeout tickets directly from the KDS device.
- Flash Changes: Tickets and fired courses on the KDS screen will flash when they're edited by someone on another device. This will help kitchen staff identify new activity on the KDS device. This setting doesn't have any effect on how tickets appear in other modes like Quick Order and Table Service.
- Fulfill Items: Enable this option if you need to know exactly what items have been fulfilled on the order. You may want to disable this if the majority of your items from prep stations are fulfilled together.
- Fulfillment method: This option allows you to fulfill individual items sent to multiple prep stations. You will need to contact Customer Care to enable this setting for your restaurant if you're interested. Learn more in this Toast Central article, Independent Prep Station Fulfillment.
- All Day Display: This is an optional view that allows you to see the number of every item that is waiting to be fulfilled. Choose between grouped by item only or grouped by item and sub-grouped by modifier. Learn more in this Toast Central article, KDS All Day Display.
- KDS Ticket Headers: You can determine whether you want the check number or the table number to be shown in large, bold font in the header of KDS tickets.
Back to top
In this section, you can specify how and when you'd like your guests and staff to receive text messages when an order is fulfilled. Learn more about this configuration in this Toast Central article, Send Text Message when Order is Fulfilled.
Back to top
Here, you can change the way certain directions, names, and dining options (such as Fire, Hold, or Dine In) appear on kitchen tickets and the KDS for increased clarity/efficiency.
Note: Any changes made in the Kitchen Setup section will only affect the KDS and kitchen tickets.
Back to top
Prep stations allow restaurants to specify which kitchen station orders and items should be sent to. For example, a restaurant with a separate station in their kitchen for salads or grill should create a specific prep station to separate what items in an order are prepared in different areas or by different people.
Learn more about prep station setup and functionality in these Toast Central articles:
Back to top
Courses can be created to pace meals. From the Courses page, you can create your custom courses and enable them using the Meal Pacing button. Learn more about setting up course firing in these Toast Central articles:
Courses that are created on this page will appear under the Preparation section of your menus, groups, and items. From there, you can attach any menu, group, or item to a specific course.
Back to top

