In this Article:
Wireless Access Point video overview.
If you are a Toast-managed restaurant, Wireless Access Points (WAP) help broadcast Wi-Fi internet throughout your space, so you can connect Toast wireless devices to your network. You will need wireless access points if you need Wi-Fi for your space, because Toast routers do not broadcast Wi-Fi directly. The amount and type of wireless access points you will need depend on the shape, style, and size of your restaurant. Toast offers indoor and outdoor wireless access points for whatever condition suits you best. This article details some best practices we recommend when installing and setting up these devices.
Your Wireless Access Point will arrive pre-configured and set up specifically for your restaurant. If you believe your wireless access point is configured incorrectly, or if you add a WAP but have trouble connecting your devices to it, please contact customer care.
Back to top
Wireless Access Point Coverage Considerations
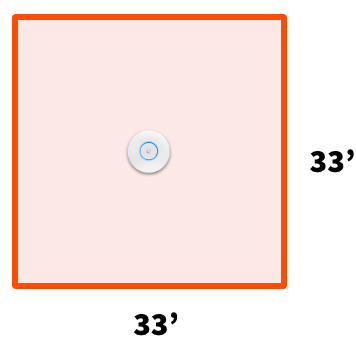
Each service area, like your dining room, lounge, bar or patio will need at least one wireless access point mounted on the ceiling in the center of the area. Each access point can cover about 1,000 sq feet when mounted in the center of a room. Alternatively, for a more practical understanding, consider that each access point can cover an area approximately twice the size of a standard garage.
To determine the number of wireless access points needed for your restaurant, you'll need to measure the coverage area, consider the shape of your floor plan, and note the types of building/wall materials that divide the space. Without considering these factors, estimating the number of wireless access points you need will be rough. If you're looking for a benchmark to make a rough estimate, however, you may approximate one access point per every 1,000 square feet.
Use the following information to generate an improved estimate count for your location.
Back to top
Coverage Area
Knowing the area in square feet or meters is a good start. As mentioned above, a very rough estimate is approximately 1 access point for every 1,000 square feet. The assumptions for this number are below:
- Typical office or residential space
- Square or rectangle-shaped area
- Single floor area
- Drywall partitions or cubicles
- Basic internet and streaming requirements
Back to top
Shape of the Area
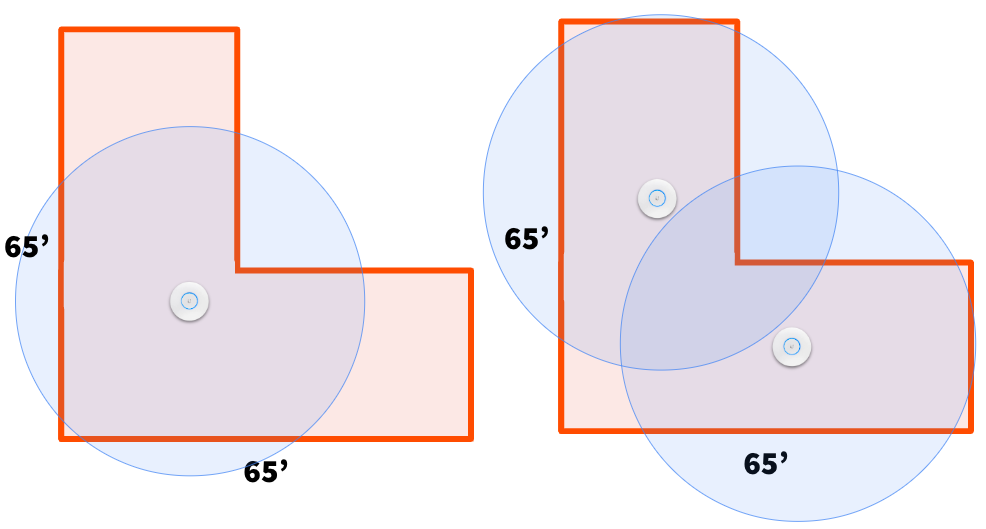
A better estimate requires knowing the shape of the area. If the area is an "L", "H" or "T" shaped floor plan, the indoor area may be the same size as the image displayed above but the access points most likely cannot be placed in a location that will be central to all users without the signal traversing multiple exterior or interior walls.
For these scenarios, the following recommendations can be used to generate a rough estimate per floor plan type:
- L Shape - multiply square footage estimate by 2
- T Shape - multiple square footage estimate by 3
- H Shape - multiply square footage estimate by 4
Back to top
Building Material
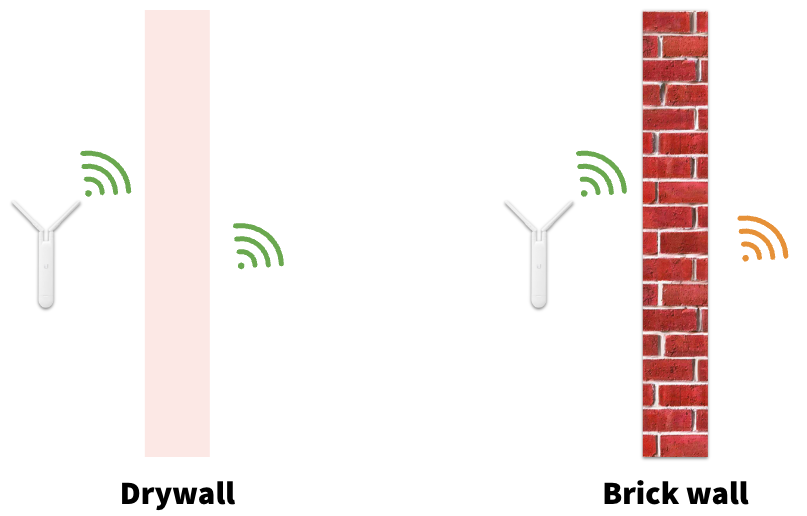
An even better estimate requires knowing the material type of each wall. The number of access points needed will increase if the internal wall material is brick, cement, or cinder block. A rough estimate is approximately one access point every 1,000 square feet or 75 square meters. In most cases, the biggest issue isn't the access point signal reaching clients, but the low-power client signal getting back to the access point.
Note: Toast doesn't supply or support guest or personal Wi-Fi networks. Toast-approved devices should be the only devices on the network for optimal system performance.
Back to top
Understand How to Power Access Points
Your Wireless Access points need power. You can provide power in one of two ways:
- Install powered Ethernet ports in the wall or ceiling next to your Wireless Access Points on the where the device will be mounted. This is not recommended in the event you choose to move your device to adjust coverage.
- Power over Ethernet is the process of providing power to your Wireless Access points using an Ethernet cable and your router or switch.
Back to top
Power over Ethernet (PoE) Overview
Power over Ethernet (PoE) utilizes Ethernet cables to provide power to your wireless access points. There are two ways to provide PoE within a Toast system:
- You can purchase a Toast PoE switch that has ports that provide PoE capabilities to any ethernet cable that is plugged into them (see our switch port mapping article for information).
- You plug WAP directly into the router or a non-PoE switch with PoE injectors. In that circumstance, a device plugs into a PoE injectors, which is then plugged in the router or switch, to provide power to your wireless access points. If you think you need a PoE injector, but it wasn’t supplied in your hardware order, please work with your onboarding consultant to purchase one.
- A Meraki Z3 router (no longer sold) has PoE ports on the router to plug into wireless access points.
This diagram demonstrates the three WAP connections to power listed above:
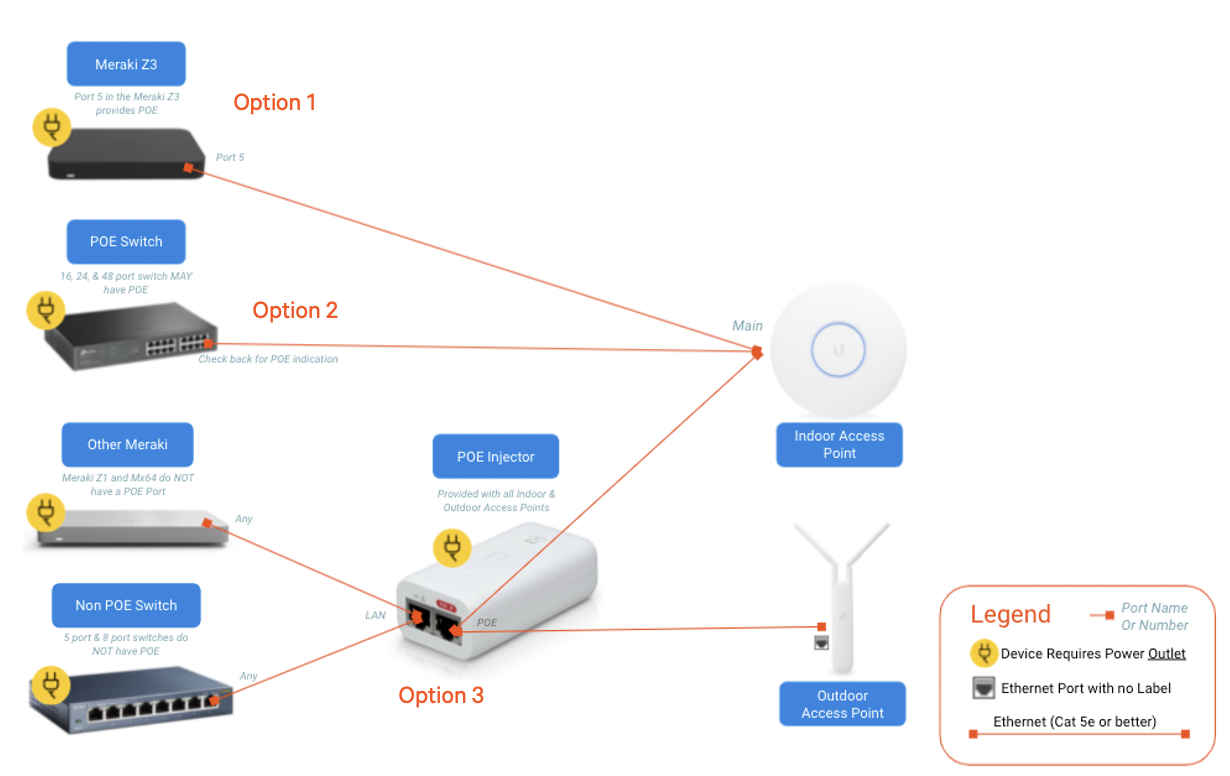
Note: Toast’s Indoor Access Points (PC26) have an AC adaptor port, but do not come with a functioning external power supply.
Back to top
Indoor Wireless Access Point Considerations
- Install wireless access points on ceilings only: Wireless access points should be installed on the ceiling of your restaurant. See the following images for an example of where this device should and should not be installed:

- The top of the wireless access point should never be blocked or facing away from the coverage area: The top of the wireless access point is where the antenna is located. This surface must always be facing the intended service area. Furthermore, the access point should never be obstructed by anything. This includes TVs, drop ceilings, signage, speakers, cameras, and more.
- The wireless access point should be at least 3 - 5 feet away from any other radio sources: Wireless access points are susceptible to interference from other devices that transmit radio frequency. Interference causes wireless connectivity to become weak and unstable. Please make sure these devices are installed away from common radio sources, such as:
- Televisions
- Radios
- Cordless Phones
- Microwave Ovens
- Other Wireless Access Points
- Power Transformers
- Automatic Door Openers
- Speakers
- Wireless Security Cameras
- Audio Amplifiers
- Disco Balls
The following is an example of a poorly placed wireless access point that was installed too close to a security camera:
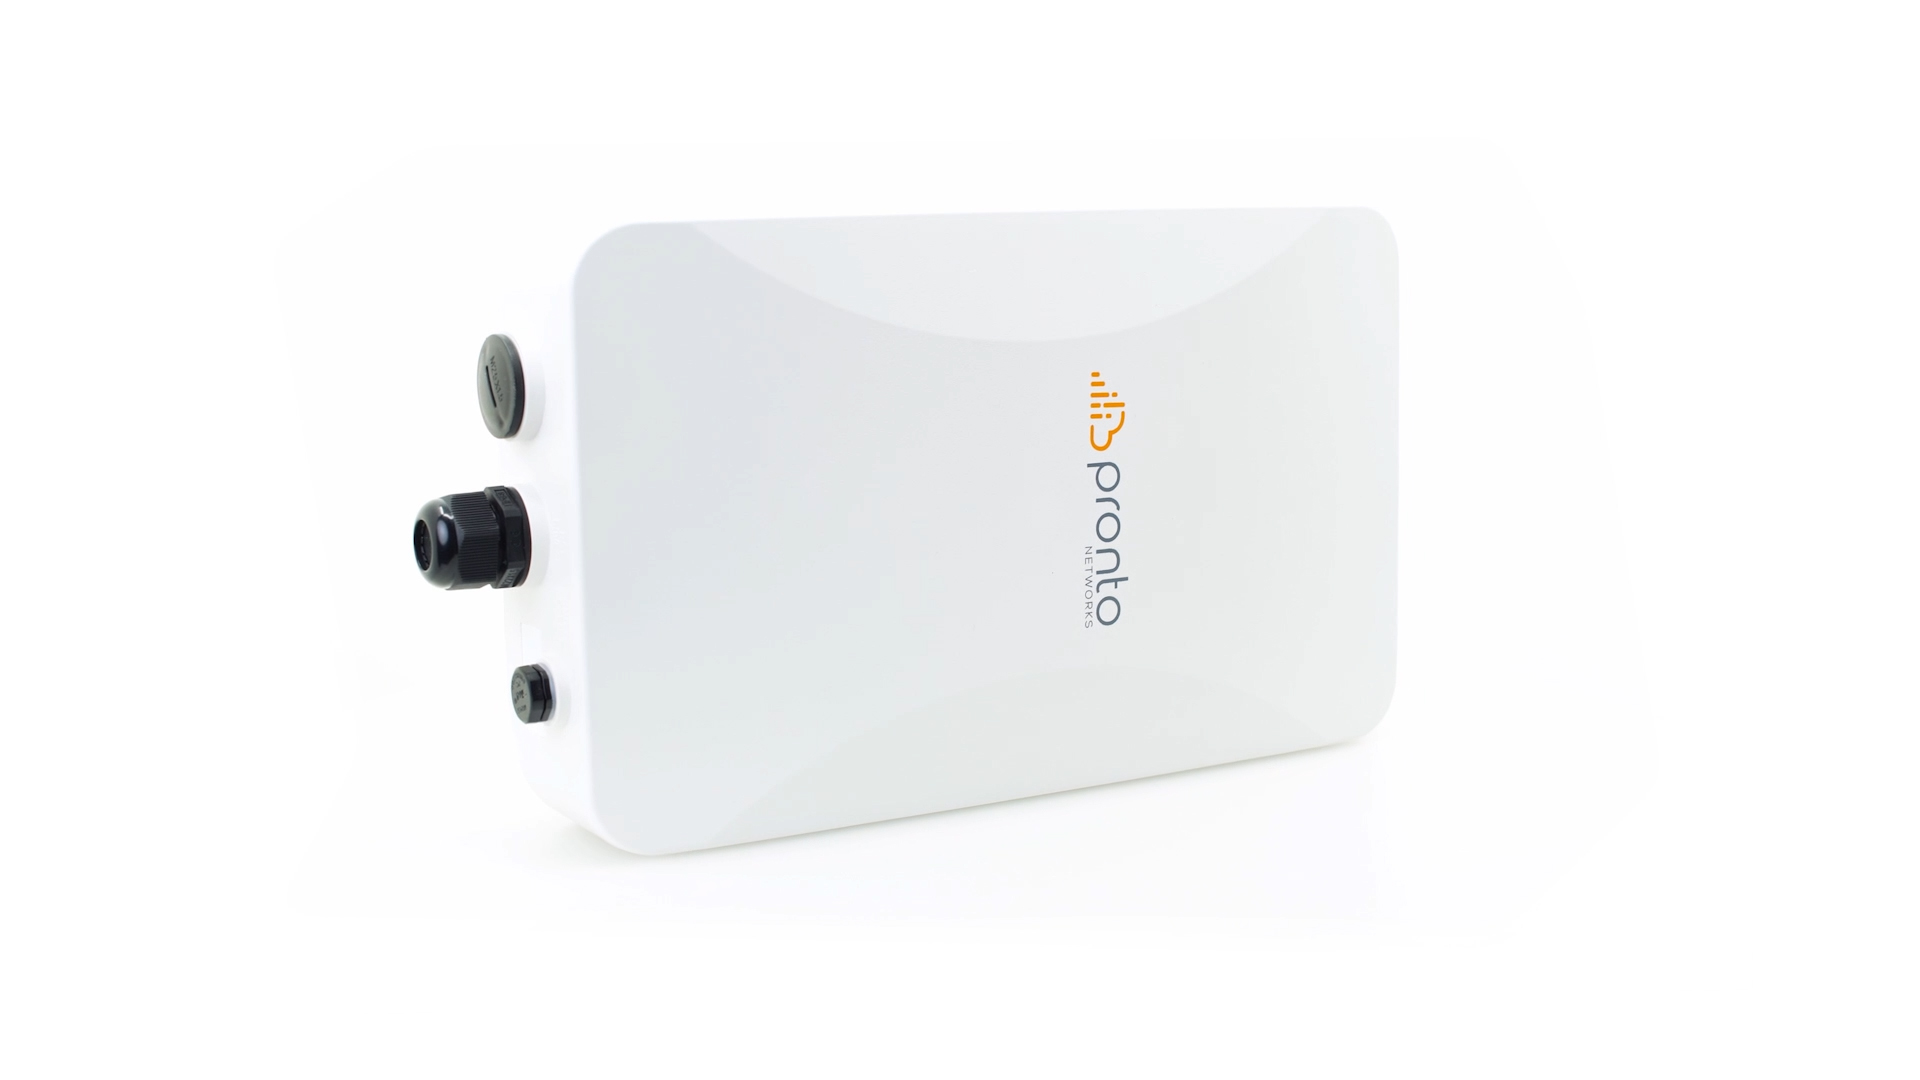
Outdoor Wireless Access Point Install Considerations
Outdoor wireless access points can be mounted on an exterior wall, ceiling, or pole. Remember, Toast is not responsible for mounting access points, so these will need to be in place before your installation.
- Each device will come with a mounting bracket, anchors, and screws.
- Remember, the mounts must be installed your Toast installation as Toast will not install the mounts, nor will they install the devices if they are higher than 10 feet.
Where the cables enter the WAP, make sure to install a drip loop into the cable to prevent water penetration and salt creep. There are two ways to do a drip loop:
- Leave some slack below the WAP, rather than have a taught cable from device to connection point (most likely a switch) to capture water away from the device.
- Coil the cable in a loop and attach it to the building with cable ties where you are affixing the WAP.
Where the cable exits the building to the WAP, there should always be waterproofing around the cable. A hold allows water or pests to compromise the device or the cables.
Install Your Wireless Access Points
| The color of your device’s LED lights may vary based on its firmware version and might not accurately indicate connectivity. We recommend confirming your network status by testing your Toast devices directly. No further action is needed if they’re online and working as expected. If your network device is not functioning after following the steps below, please contact Customer Care. |
Mount Your Toast Indoor Access Points (PC26)
- To install the mount into a wall, begin by removing the bracket from the access point. Use the bracket to mark where to drill your holes.
- Next, pre-drill pilot holes for the anchors. Then, insert the anchors into the holes and secure the bracket to the wall by screwing through the bracket into the anchors. When mounting to a ceiling or drop ceiling, be sure to use the appropriate fasteners to ensure a stable mount.
- Once the mounts are installed, the access points can easily slide and click back onto the access point.

Back to top
Mounting your Outdoor Wireless Access Point (PC27)
- You will need to use an appropriate fastener for the surface to which you're mounting the outdoor access point. This will vary based on the material on the exterior of your building and is therefore not included with the device.
- The Ethernet cord will run through the bottom hole in the outdoor access point. To connect this, unscrew the gasket. There will be a rubber collar available if you are putting this in an area that might get wet. Next, snake through the ethernet cord through the gasket and rescrew the gasket onto the access point.
- The outdoor mounting bracket will also come with a pole clamp if you plan to secure it to an outdoor pole. This will fit through the back bracket. Screw into place to tighten the clamp.
- If you have questions about this, please work with a local contractor or IT person.
Back to top
Install your Toast Indoor or Outdoor Access Point
- Locate your Toast Wi-Fi access points.
- The installation of a wireless access point is different depending on the type of switch you’ve purchased:
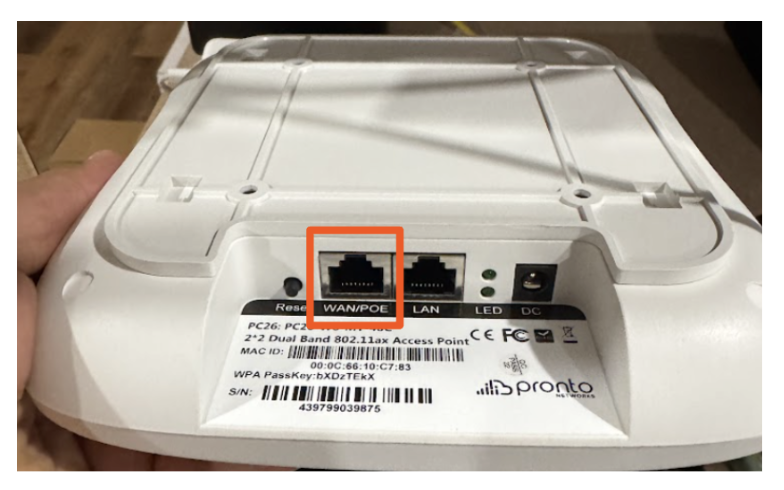
- If you have a Power over Ethernet (PoE) switch, take one end of your Ethernet cable and insert it into the PoE port on your switch. Then take the other end and connect it to the wireless access point “WAN/POE” port.
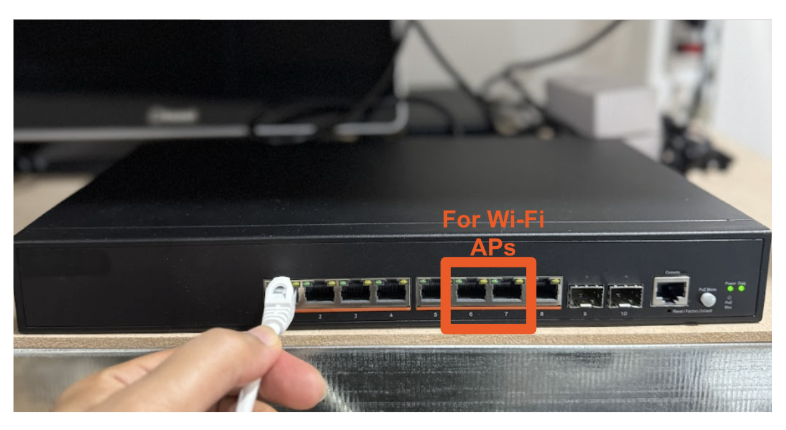
Refer to the following table to instruct on where to plug each device into the PoE switch:
| Switch Size | Model Number | Uplink Port | Toast Device Ports | Wireless Access Point Ports | Downlink Port |
|---|
| 8-port Switch | SC-08P | 1 | 2 - 5 | 6 - 7 | 8 |
| 24-Port Switch | SC-24P | 1 | 2 - 17 | 18 - 23 | 24 |
| 48-Port Switch | SC-48P | 1 | 2 - 41 | 42 - 47 | 48 |
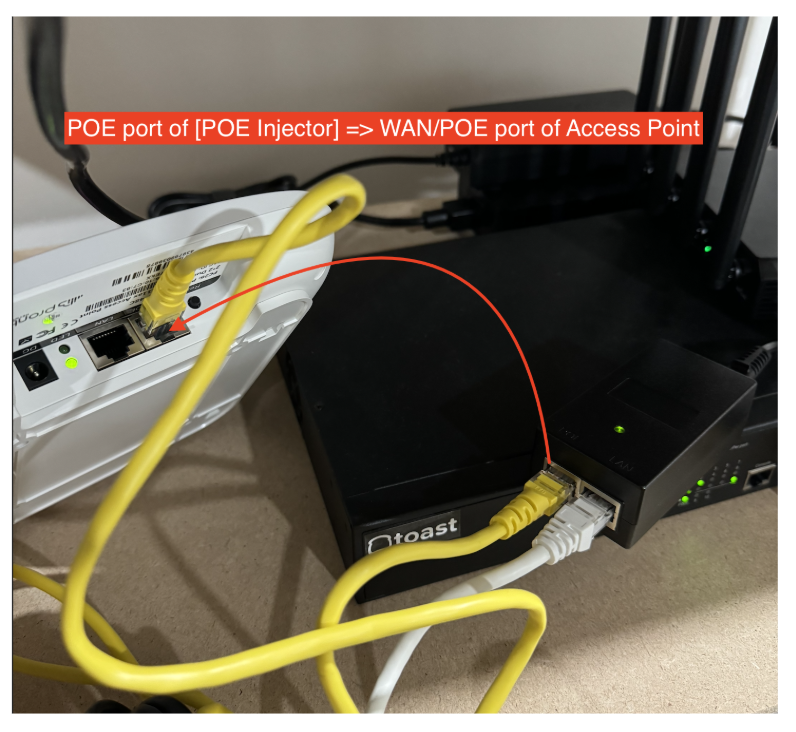
- If you have a Non-Power over Ethernet (Non-PoE) Switch: Using the POE Injector you were sent, connect one ethernet cable from the switch port to the LAN port of the POE Injector, and using the second ethernet cable, connect the POE port of the POE injector to the WAN/POE port of the Access point.
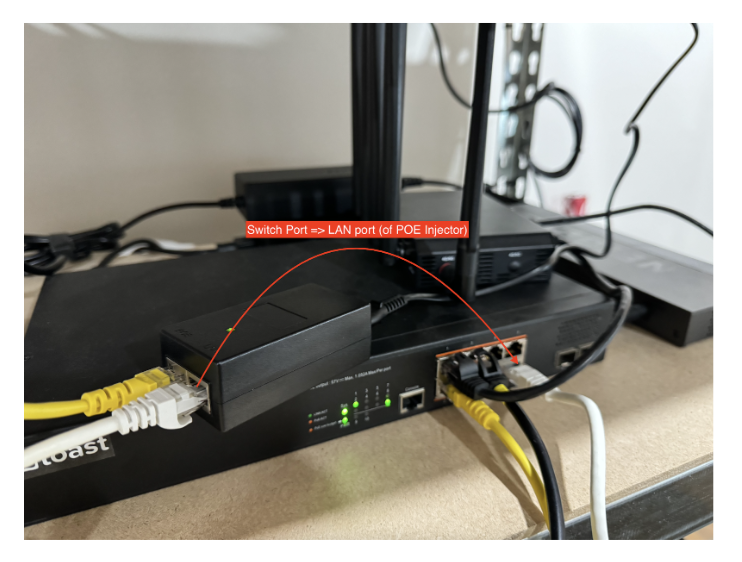
Refer to the chart below for device port mapping for non-POE switch devices.
| Switch Size | Model Number | Uplink Port | Toast Device Ports | Wireless Access Point Ports w/PoE injector | Downlink Port |
|---|
| 8-port Switch | SC-08 | 1 | 2 - 5 | 6 - 7 | 8 |
- Confirm that the access point is installed correctly.
- For indoor access points (PC26), refer to the indicator light:
- When you see a solid purple indicator, this means the device is connected to power.
- Once the entire system is on, the indicator light will be white, which indicates that it is also receiving and broadcasting Wi-Fi.

- For Outdoor Access Points (PC27)
- Log onto your Wi-Fi network and look for the Toast SSID. This confirms that your device is broadcasting Wi-Fi. Please note that the secure SSID is for Ubiquiti access points only and will not appear for Toast Wireless Access Points.
- Once your access point (either indoor or outdoor) is all set up, you will see two new networks that indicate your access points are working correctly. They both begin with your restaurant name, but one ends with "_toast" and one ends with "secure" "Rxname_toast" and "Rxnamesecure". Log into the secure network to transition to the Toast network to verify that the network is working appropriately.
Back to top

