In this Article:
| The screenshots in this article reflect the new kiosk experience. To learn how to enable this experience, check out this Toast Central article: Set Up Your Kiosk. |
- On the kiosk homepage, your guests will tap the screen to start their order.
- If you've enabled both Dine In and Takeout dining options for your kiosk, guests will be prompted to choose between those two options.
- Next, guests can view your menu and choose items to add to their order. They can scroll vertically through menu groups on the left, or scroll through all menu items on the right.
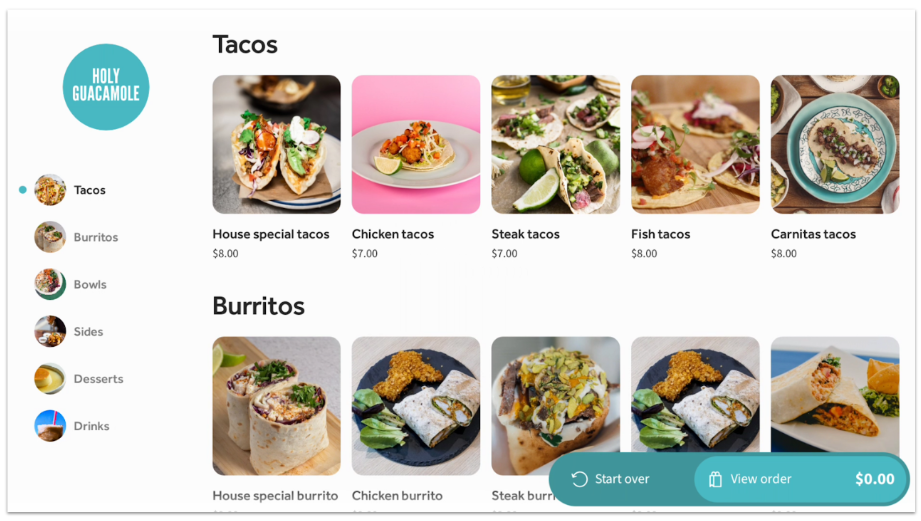
- Guests can select any item to add it to their order.
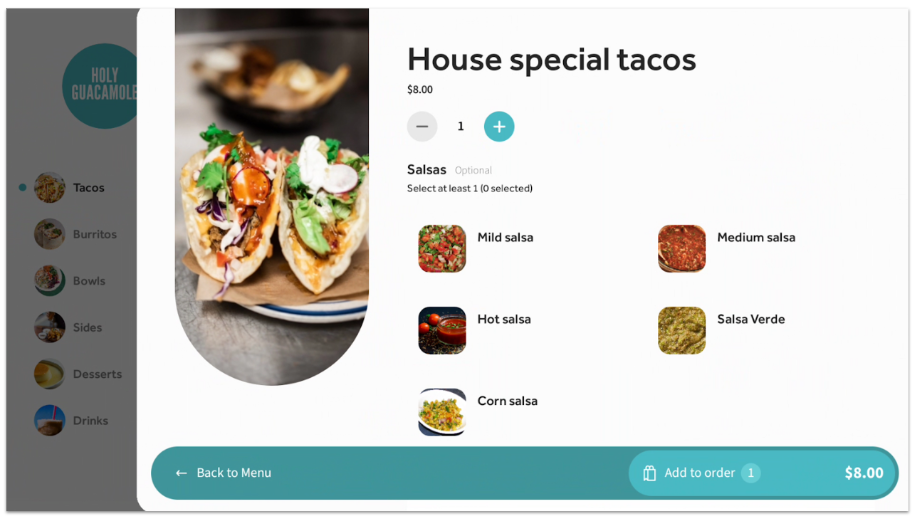
- An item detail pane will slide out from the right side of the screen to show the item description and allow the guest to change the quantity and add the item to their order.
- If the item has modifiers, the guest can scroll down to view options, and will be asked to choose required modifiers or make any other preferred changes. If there are nested modifiers, additional options will appear on the screen for the guest to make their selection. Any price changes for modifiers will be reflected in the item total in the bottom right corner of the screen.
- In the new kiosk experience, if your guests have reached the maximum selection that you've set for a modifier group, they will be forwarded to the next available modifier to make their selections. If you have not set a maximum limit, they will need to manually scroll to the next modifier group to make their selections. Guests will have the option to scroll at any point back to their selections and make edits as needed.
- If your guest selects an optional modifier with a nested modifier attached to the item, they will have the option to unselect their initial selection by selecting the Cancel button below. Then, it will bring them to the order page where they can make their selection again. Once completed, your guest can select the Continue button to confirm their order.
- If you have special requests enabled for kiosk in Toast Web, guests will have the option to input a special request when adding an item to their order. This is great for modifications to meals, alerts to allergies, etc. To configure this feature, check out this Toast Central article, Set Up Your Kiosk.
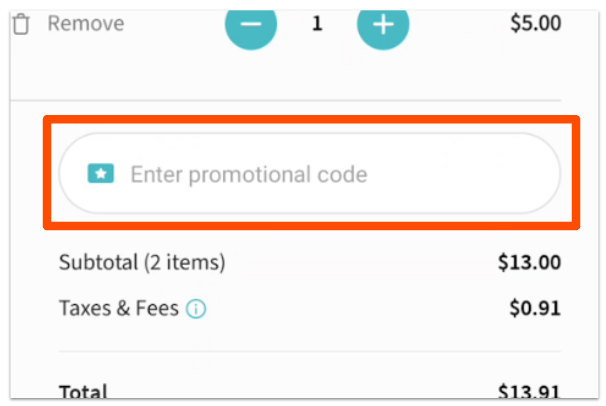
- When your guest is ready to check out, they’ll select View order at the bottom of the screen to review the items in their cart and edit their order as desired. If you have a promo code available for kiosk, your guests will be able to enter it on this screen.
- Take the order placing experience to the next level for your guests by suggesting upsell items before guests checkout! Learn how to add these in the Configure Menu Options for Kiosk section of Set Up Your Kiosk.
- When they’re ready to continue, guests will select Checkout now at the bottom of the screen. If you’ve configured it in Toast Web, they’ll be prompted to enter any optional or required guest information. To learn how to enable this feature, see Dine in and Take Out Order Settings for Kiosk in the Toast Central article Set Up Your Kiosk.
- The next screen will prompt your guests to make a card payment. At the bottom of the screen, there will be buttons for Pay with cash or Pay with gift card (if enabled).
- Guests who pay with cash will have a receipt printed out that they will bring to the cashier. Guests who pay with credit or gift card will continue through the tip and receipt selection screen, selecting Continue to finalize their payment.
- Once an order is complete, guests will see a screen that displays their order number.
Back to top
To remove an item from the cart, modify the item, or change the quantity of an item, select View order to view the items in the cart.
- Use the plus (+) and minus (-) buttons to change the quantity ordered.
- Select Remove to completely remove an item from the cart.
- Select Edit item to make changes to modifier selections.
The cart (My Order screen) will update to reflect any changes.
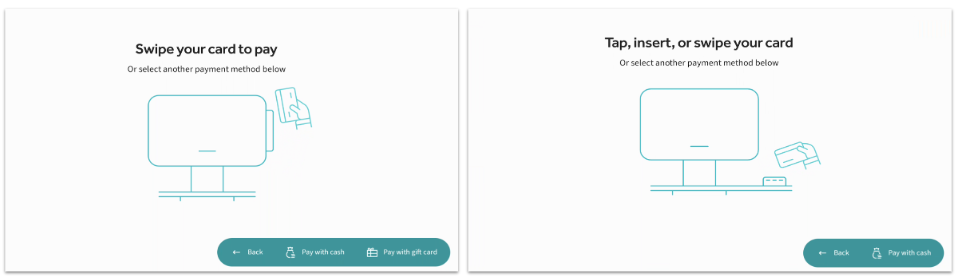
Restaurants using kiosks can accept credit cards, debit cards, and gift cards for payment. From the payment screen, guests can simply swipe or tap their credit card to pay. One of the graphics below will display on the screen, depending on your card reader hardware.
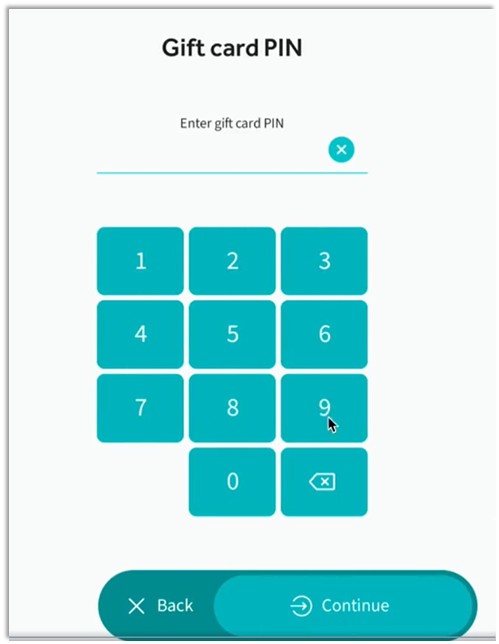
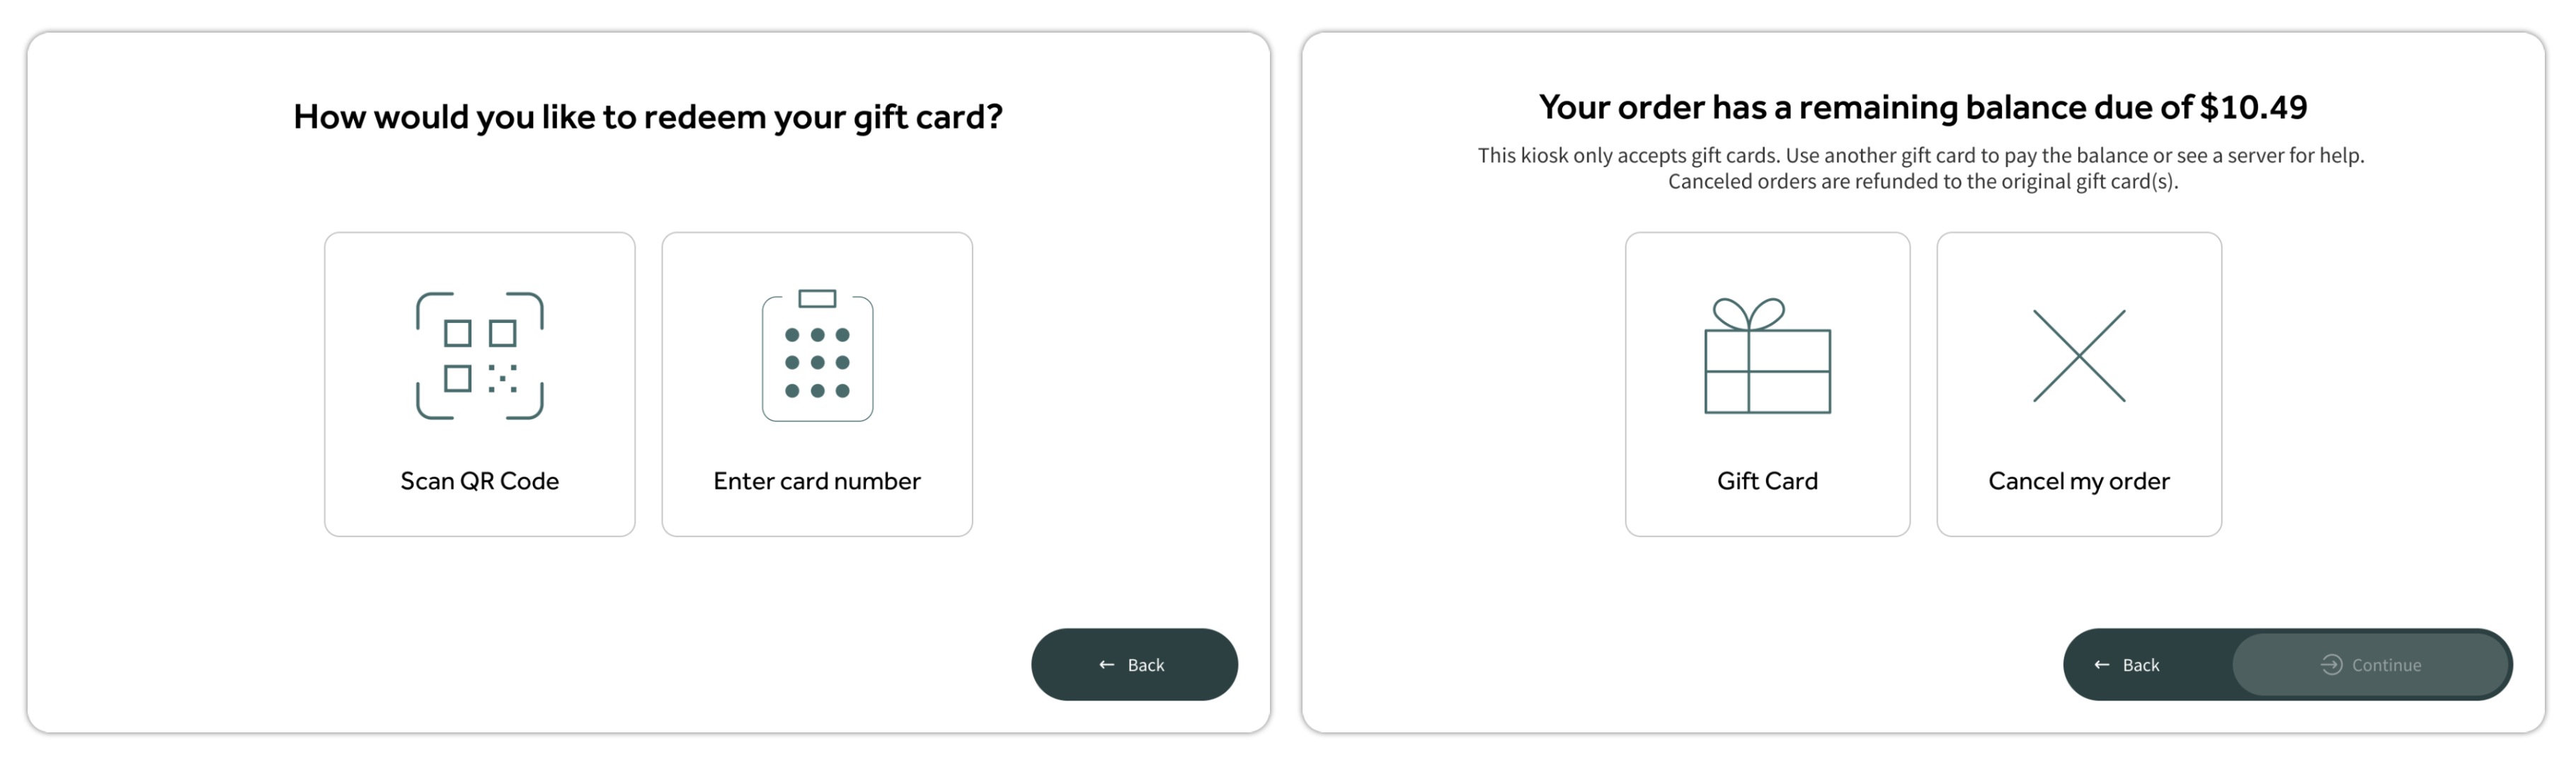
If gift card payments are enabled on the kiosk (see Set Up Your Kiosk for instructions), your guests can select Pay with gift card at the bottom of the payment screen and follow the on-screen instructions to swipe, scan, or enter their gift card number. If they're using a third-party gift card that requires a PIN entry, they will be forwarded to the Gift card PIN screen where they can enter their PIN.
Back to top
NEW! Multiple Gift Card Payments
Restaurants using kiosks now accept multiple gift cards per transaction, ensuring greater payment flexibility and reducing checkout friction for your guests.
How it works: If a guest's first gift card doesn't cover the full order, the Kiosk will automatically prompt them to enter another gift card or select a different payment method to complete the remaining balance.

Back to top
Some restaurants may choose to add a tip option to their kiosks for after credit card or gift card payments. You can enable this tipping option by navigating to Front of house > Mobile dining solutions > Kiosk setup, and toggling the Tipping screen setting to the On position. Save and publish your selection on this page.
You'll also need to ensure that digital receipts are enabled if they aren't already. For instructions, see this Toast Central article: Get Started With Digital Receipts.
A few notes for kiosk payments:
- Credit/debit card tip screens will show suggested tip amounts, a custom tip button, a "no tip" button, and a signature line. Guests will select Complete payment when done.
- You can customize kiosk tip percentages on the Kiosk setup page in Toast Web.
- U.S. restaurants: You can configure the credit card signature threshold and remove the signature screen so that signatures aren’t required for orders below a specific amount. To learn more, see Adjust Credit Card Signature Threshold.
- Tipping with a gift card is a little different. Guests will see their remaining gift card balance and only be able to select tip buttons that are covered by their remaining balance.
For example, if a guest's order total is $25 and their gift card balance is $30, they cannot tip more than $5 on this order. Any tip buttons that would equal more than $5 would be grayed out.
Back to top
Restaurants using kiosks are able to direct guests who would like to pay for their order with cash to a cashier. In order to do this, you must enable cash payments on your kiosk device. To learn more about enabling cash payments for your self-ordering kiosk, check out this Toast Central article: Set Up Your Kiosk.
You will also need a printer attached to your kiosk in order to make use of this feature.
Once cash payments for kiosk are enabled, a guest would follow these steps:
- From the payment screen, select Pay with cash.
- Select Print receipt on the following screen. A QR code will be printed on the receipt that the cashier will scan to pull up the check information for payment.
- Present the receipt to a cashier to be scanned.
The cashier will then be able to process cash payments for the guest as normal. Your staff can look up the order by QR code using your terminal's front facing camera. In Quick Order mode, select the three-dot overflow menu, select Lookup check, and then select Scan.
Back to top
Note: At this time, Toast Loyalty is only available for restaurants located in the U.S.
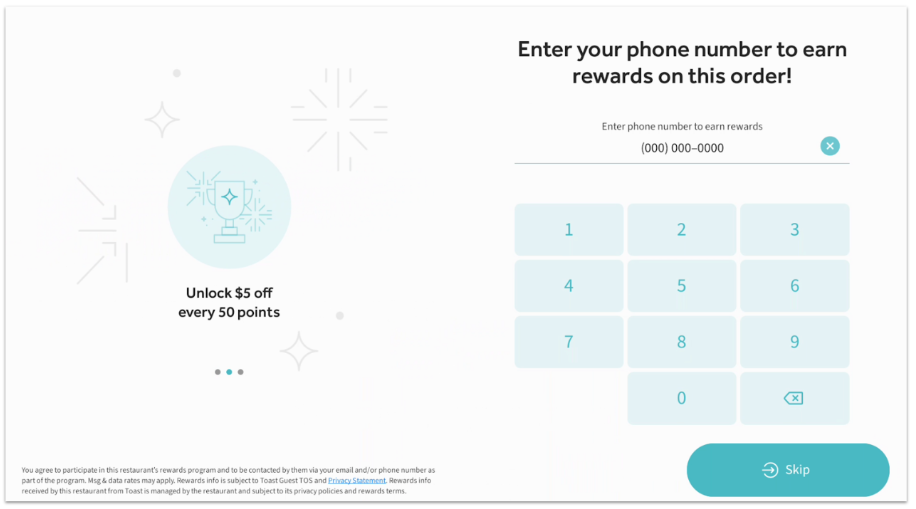
If you have Toast Loyalty set up for your restaurant, guests will be prompted to enter their phone number (or email address, based on your Loyalty configuration) when they begin to place an order. They have the option to skip this step by selecting the button at the bottom of the screen.
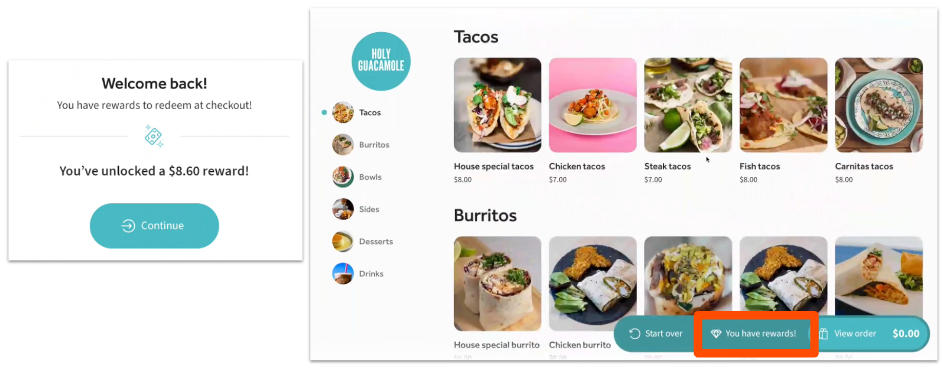
If your guest already has a loyalty account at your restaurant and they enter their information, they’ll see a welcome message with any rewards they have available. During the order process, they’ll also see a “You have rewards!” button (if applicable) at the bottom of their screen, which they can select to view available rewards.
If your guest doesn’t have a loyalty account yet, entering their information on this screen will sign them up for an account so they can accrue points with every order towards future rewards.
Back to top
Note: At this time, Toast Loyalty is only available for restaurants located in the U.S.
Once a guest has accrued enough points to receive an award (either cash-based or item-based rewards, depending on your Toast Loyalty setup), they may use their reward on future orders placed through a self-ordering kiosk.
- When placing a new order, the guest will enter their information to connect to their loyalty account.
- A pop-up will appear with available rewards. Guests can choose to redeem a reward and apply it to their order, OR they can select “You have rewards!” at the bottom of the order screen later during the order process to view and apply a reward.
- The discount will then be applied to the current order.
Back to top
Note: At this time, third-party loyalty integrations are only available for restaurants located in the U.S.
Kiosk supports check-in and reward redemption for third-party loyalty integrations. When a guest starts the process of placing an order (after they select a dining option, if you offer both Dine In and Take out), they’ll see a screen similar to the one below that allows them to look up their loyalty account.
Kiosk supports up to four different methods of third-party loyalty check-in (QR code, phone number, email, swipe loyalty card), and the screen that your guests will see will only show the options available at your restaurant.
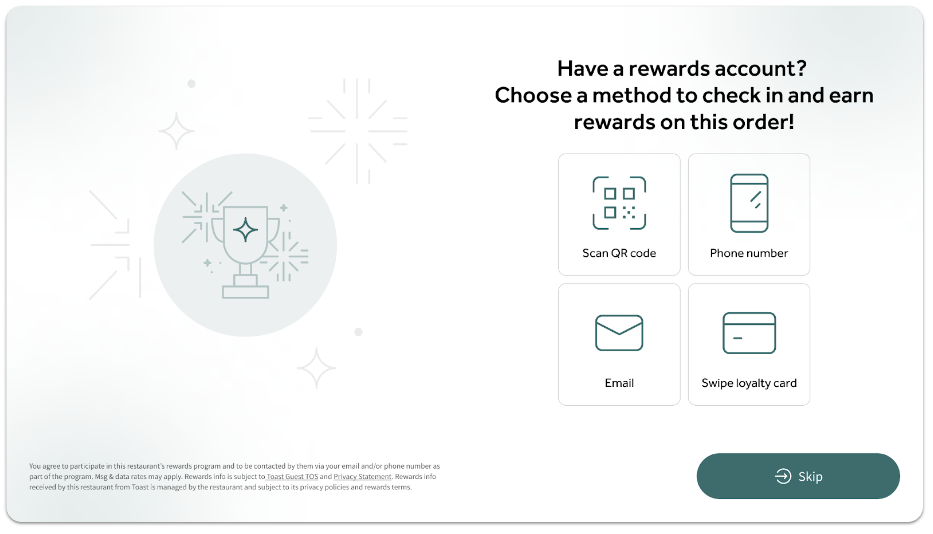
If guests choose to skip this step, they can always pull it back up by selecting the rewards button that will be at the bottom of the screen.
Note: New customer sign-up via kiosk is not supported for third-party loyalty integrations.
Back to top

