In this Article:
Sales Categories Overview
Sales categories are used to break down your sales based on the categories of your items. Common examples of sales categories are Food, NA (non-alcoholic) Beverage, Liquor, Wine, Beer, Retail, etc. Once these categories are created and then applied to your items, the Sales Summary and PMIX reports will provide a breakdown based on the sales that occurred by their category. If you don't see sales categories in your sales reports, check your report settings to make sure the sales category column is visible.
Effective sales category assignment ensures accurate financial and operational insights, aiding in better decision-making and streamlined operations.
Note: You can only assign one sales category to each item.
Back to top
Create New Sales Categories
To create new sales categories for your menu items, follow these steps:
- In Toast Web, navigate to Menus > Settings > Sales categories.
- On the next screen, select + Add to create as many sales categories as you need. You can add a description to clarify the difference between them.
- Save your changes.
You can select Order at the bottom of the page to rearrange your sales categories as needed.
Now that the categories have been created, you'll need to apply them to the menu so that future sales begin recording to their category.
Back to top
Note: Previous sales data will not be automatically retroactively updated with sales categories. Customer Care can help update historical sales category data for the past two weeks. Provide details such as the date range, specific locations, and items requiring updates.
To assign sales categories to your menus and items, follow these steps:
- In Toast Web, navigate to Menus > Bulk management > Advanced properties.
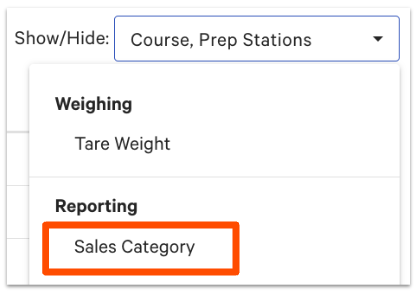
- Open the Show/Hide drop-down, and under Reporting, select Sales Category.
- Assign a sales category to all menu items. You can do this at the menu, menu group, or item level using the arrows to expand your menu list as needed.
- Save and publish your changes.
Once assigned, future sales from each of these menus will be broken down by category in your Sales Summary. This does not affect/categorize previous sales prior to making these changes.
Note: Items and modifiers report to the sales category of their parent menu unless otherwise selected in Advanced Properties.
Back to top
Once you’ve created sales categories, you can assign them to your inventory within the item library. We recommend assigning sales categories at the category group or category level whenever possible. This way, all items within the group will inherit the same sales category and you won’t have to assign them individually.
- In Toast Web, navigate to Retail > Item management > Item Library.
- Select the name of an item to open the item details page. Scroll down to the Reporting section.
- To assign a sales category to a category group, category, or subcategory, make sure the Inherit settings toggle is in the on position.
- Alternatively, if you want this specific item to have a different sales category than the rest of the group it belongs to, you can toggle Inherit settings off and then select your desired sales category for this specific item.
- Select the gear icon to configure sales categories at the parent level.
- Select your desired sales category from the drop-down for the category group, category, and subcategory level as needed.
- Save your changes.
- Repeat steps 2-6 for any items in a different category group/category, or for any items with a unique sales category.
Back to top
Identify Items Without a Sales Category Assigned
Need a quick look at which items have no sales category attached? Follow these steps to find your items that don't have a sales category, and then use the steps in Assign Sales Categories to Your Menu Items / Assign Sales Categories to Your Retail Items to add the correct category to each item.
- Navigate to Reports > Menus > Product Mix. If you see a banner at the top of the page, make sure you switch to the new version of the PMIX report.
- Select More filters at the top of the report.
- Open the Sales categories drop-down and check off the No sales category option.
- Select Apply filters.
- The PMIX report will refresh to show you any items that don't have a sales category assigned. Follow the steps in Assign Sales Categories to Your Menu Items / Assign Sales Categories to Your Retail Items to assign a sales category to each of these items.
Note: Items may still appear as uncategorized if they belong to archived menus. To resolve this:
- Locate the archived menus and restore/unarchive them (Use the Items Database to View and Manage Menus).
- Assign sales categories to the items within these menus.
- Re-archive the menus after assigning the appropriate sales category.
Back to top

