In this Article:
If you're looking for data on your scheduled future orders, check out this Toast Central article: Report on Scheduled Future Orders, or read Export a List of Future Orders and View Future Orders for more on scheduled order reports.
Toast allows a manager to set up a maximum number of days in the future for which an order can be scheduled.
To configure future order settings for POS orders, follow these steps:
- In Toast Web, navigate to Front of house > Order screen setup > UI options.
- Scroll down to the POS Scheduling Settings section.
- Enter the desired number for the Max days in future to schedule orders setting.
- Save and publish your changes!
Note: This is a store-level setup, so enterprises can set different lengths of time for individual stores. The default is 365 days, but it can be set to any value greater than zero.
Back to top
Check out this Toast Central article on Future Order Setup: Pick Up Mode and Auto Send for information on additional future order setups specifically created to support the unique operating needs of bakeries and catering-style restaurants.
Back to top
To configure future order settings for Online Ordering, follow these steps:
- In Toast Web, navigate to Takeout & delivery, and select Online ordering setup which appears at the bottom of the Toast Online Ordering section under Related Settings.

- Scroll down to the Online Ordering Scheduling Settings section.
- If you'd like your guests to have the ability to schedule their online order for a future date or time, choose Yes, guests may schedule orders for the Enable Scheduling setting.
- If you'd like to change the default date range (14 days), select Custom Date Range for the Max Future Scheduled Order Date setting, and enter your desired number of days. If you only want to allow guests to order ahead through the end of the day, you would enter 0 in the Custom Date Range field.
- Save your changes when finished!
When future scheduling is enabled for online ordering, this is what guests will see when they place their order:
| Online Ordering Page | Local by Toast app |
 |  |
By selecting No, all orders will be fulfilled as soon as possible, your guest will not see an option to choose a date or time. This is what they'll see when placing an online order:
| Online Ordering Page | Local by Toast app |
 |  |
Note: Guests who place a future order scheduled for more than 48 hours in the future on Online Ordering, Online Ordering Pro, or Toast Local will receive a reminder email 24 hours before their order is ready for pickup/delivery.
Back to top
To schedule a POS order for a future date or time, follow these steps:
- Start by entering the guest's order.
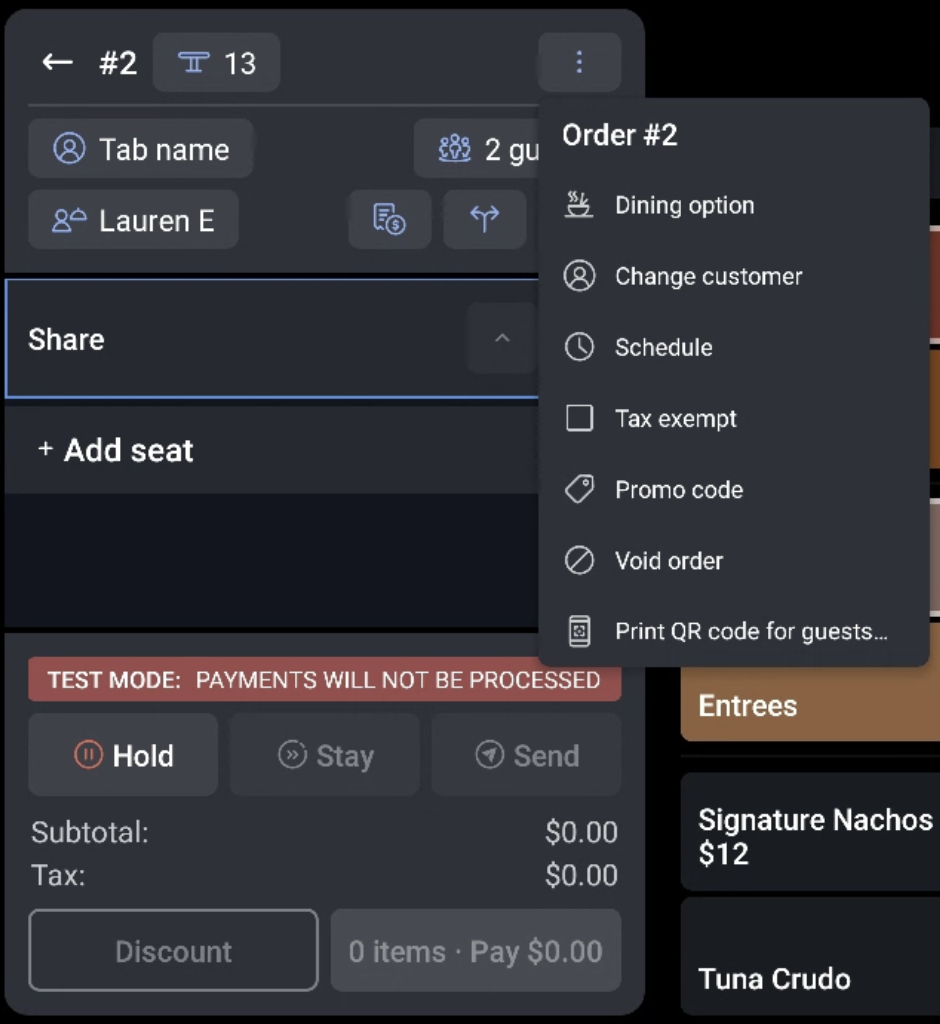
- Open the overflow menu (three dots) from the check details. Select Schedule from the overflow menu.
- You'll be prompted to set the preparation time. The preparation time will be relative to the order's schedule. In the example below, the preparation time is set for 4 hours and 30 minutes. This means that the order will fire to the kitchen 4 hours and 30 minutes before the scheduled time for the order. Select Next once you're finished.

- After entering a preparation time, you'll be prompted to select a date and time for pick up. When finished, select Select.
- The order's scheduled date will appear at the top of the check details on the order screen. You can collect the guest's payment in advance or Send the order to collect payment when the guest picks up their order.

If a guest's payment is collected in advance and they wish to add additional items to the order, the guest will need to provide payment once again to bring the balance back to $0, as Toast does not save payment information.
Back to top
In order to successfully send scheduled orders to the kitchen, exactly one device must have order auto-firing configured.
- Access Device Setup from the Device menu.
- Select Yes for Order Auto-Firing.
- Ensure that there is only one dedicated device with Order Auto-Firing enabled.
- You may need to review the same settings to make sure none of your other devices has this setting enabled.
Back to top
Future orders that are placed through Toast are stored in the Pending Orders mode from the main menu dashboard.

The Pending Orders screen has two sections:
- Needs Approval:
- If Toast Online Ordering is being utilized, this page holds orders that do not meet automatic approval rules. In rare cases that an order does not automatically approve and fire to the kitchen due to network issues, the order will be stored here.
- Future Checks:
- If an order is placed for a date and/or time in the future, this page will hold those orders up until the order is scheduled to fire to the kitchen. This page also provides a few order management tools:
- New Order - A shortcut to Quick Order mode to place a new order
- View Dates - Edit the range of dates by which Future Orders are shown
- Reschedule - Edit the existing future date, time, and prep time for the selected order.
- Update - Identical to the Update function in Previous Checks, this allows the user to open the order in ordering mode and make changes to the order (add/remove items, edit modifiers, etc)
- Pay ($) - Identical to the Pay ($) function of Previous Checks, this allows the user to enter the payment mode of the order to take payment, edit an existing payment, void payment, etc.
Back to top
If a future order needs to be prepared earlier than the scheduled time, you may fire it to the kitchen ahead of time as long as the order has been approved already.
- Begin in Pending Orders mode. Verify that the order is not in the Needs Approval tab.
- If it is, select the order and then select Approve at the top of the screen
- If the order is not found under Needs Approval, select the Future Checks tab.
- Select the check in question and then select Fire Now.
Back to top
Bulk printing allows you to manually send/print multiple future orders to the kitchen.
Note: This does not affect the “fire time” of the order. The order will still “fire” at a configured time based on the requested fulfillment date and the prep time.
If an order was previously sent using this feature:
- A printed ticket will NOT print again at the fire time
- A KDS (Kitchen Display Screen) ticket will update to the “Fired” state at the fire time
- To send multiple orders to the kitchen, go to Pending Orders and select Future Checks.
- Next, long press on any order. You can then choose multiple tickets or Select All. Once a group of tickets is selected, choose Print to Kitchen and all tickets will print to the appropriate Expo/Prep station.
If you need more options for when future orders are visible to the kitchen, check out this Toast Central article on Future Order Setup: Pick Up Mode and Auto Send for more details.
Back to top
Scheduled Orders Not Sending Properly
If you're experiencing issues with the scheduled orders feature not sending tickets promptly, causing food preparation delays, there are several steps you can take to troubleshoot and resolve the issue:
- Scheduled orders will not be sent to the kitchen when created and will instead fire based on the configured prep time. This means that the system is designed to send tickets to the kitchen based on the item's prep time
- Check if the order appears on your POS under Pending Orders.
- Ensure that you do not have any non-printing prep stations set up on your auto-firing device. On your POS, navigate to Device Setup and select Non-Printing Prep Stations. If any are selected, de-select the prep stations that you want online orders to be able to send to.
- If you're using the Kitchen Display System (KDS) to manage kitchen tickets, verify your ticket filters on the device to ensure all of the dining options/courses used for your online orders are selected to display. In Device Setup, select Ticket Display Options to see any filters you may have set.
Back to top

