In this Article:
Get Started with Toast Networking & Devices
Welcome to the Toast family! Part of getting your space ready to support your business is installing a network for your Toast devices to connect to, for fast, and stable service.
Please refer to the following article if:
- You have already reviewed and are working towards your Site Readiness Requirements.
- You have reviewed your Toast Onboarding Package (see Understand Toast Onboarding Packages) to clarify whether you've purchased an on-site installation (a Toast contractor will be physically coming onsite to your location) or a remote installation (a Toast contractor will be assisting you remotely using video conferencing or a phone call). Note: Toast does not provide mounting or cabling services, so the cost is not included in your implementation quote.
- You have a Toast-managed network. This means you’ve purchased your networking hardware from Toast.
To avoid cancellation fees and ensure a smooth installation or transfer to Toast POS, please follow this guidance closely. It will be covered during your conversations with your Onboarding Consultant, and they'll make sure to provide you time for questions.
Back to top
Toast Networking Overview
Note: Restaurants are required to purchase new networking equipment when establishing a new Toast account. This could be a new restaurant opening, an existing restaurant that is new to Toast, or an existing Toast restaurant that is adding a new location.
| Toast does not support repurposing, reusing, or transferring network equipment between previous Toast locations. |
Before setting up your Toast devices, such as your Toast Flex or Printers, you must set up your networking equipment. If you are a Toast-managed customer, your network is created by installing the equipment you purchased from Toast, for your specific location that’s about to open, to the modem provided separately by your internet service provider (ISP).
Several pieces of equipment comprise a network setup:
- A router that connects to your business’s internet setup. This router will automatically create the Toast subnet (192.168.192.0/24) and allocate IP addresses to connected Toast devices.
- Potentially a switch. Because routers have a limited number of ports, if you have more than three devices that require a wired connection, you will need a switch to help manage your device connections and cables.
- Potentially indoor or outdoor wireless access points are needed if you need to support devices outside of the range of your router or require a wireless connection.
Back to top
Toast Networking Diagram
Below is how you should plan out your network device setup in your space:
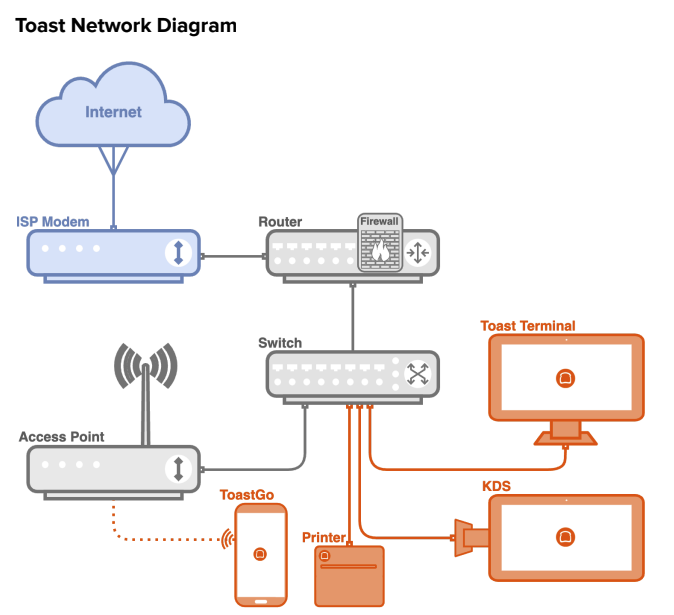
As shown in the above diagram, these devices connect to one another via Ethernet cables in the following order:
- ISP Modem: Connects to the Pronto Router
- Pronto Router: Connects to the Pronto Switch
- Pronto Switch: Connects to the Pronto Access Point
- Toast devices will connect to the Pronto Switch
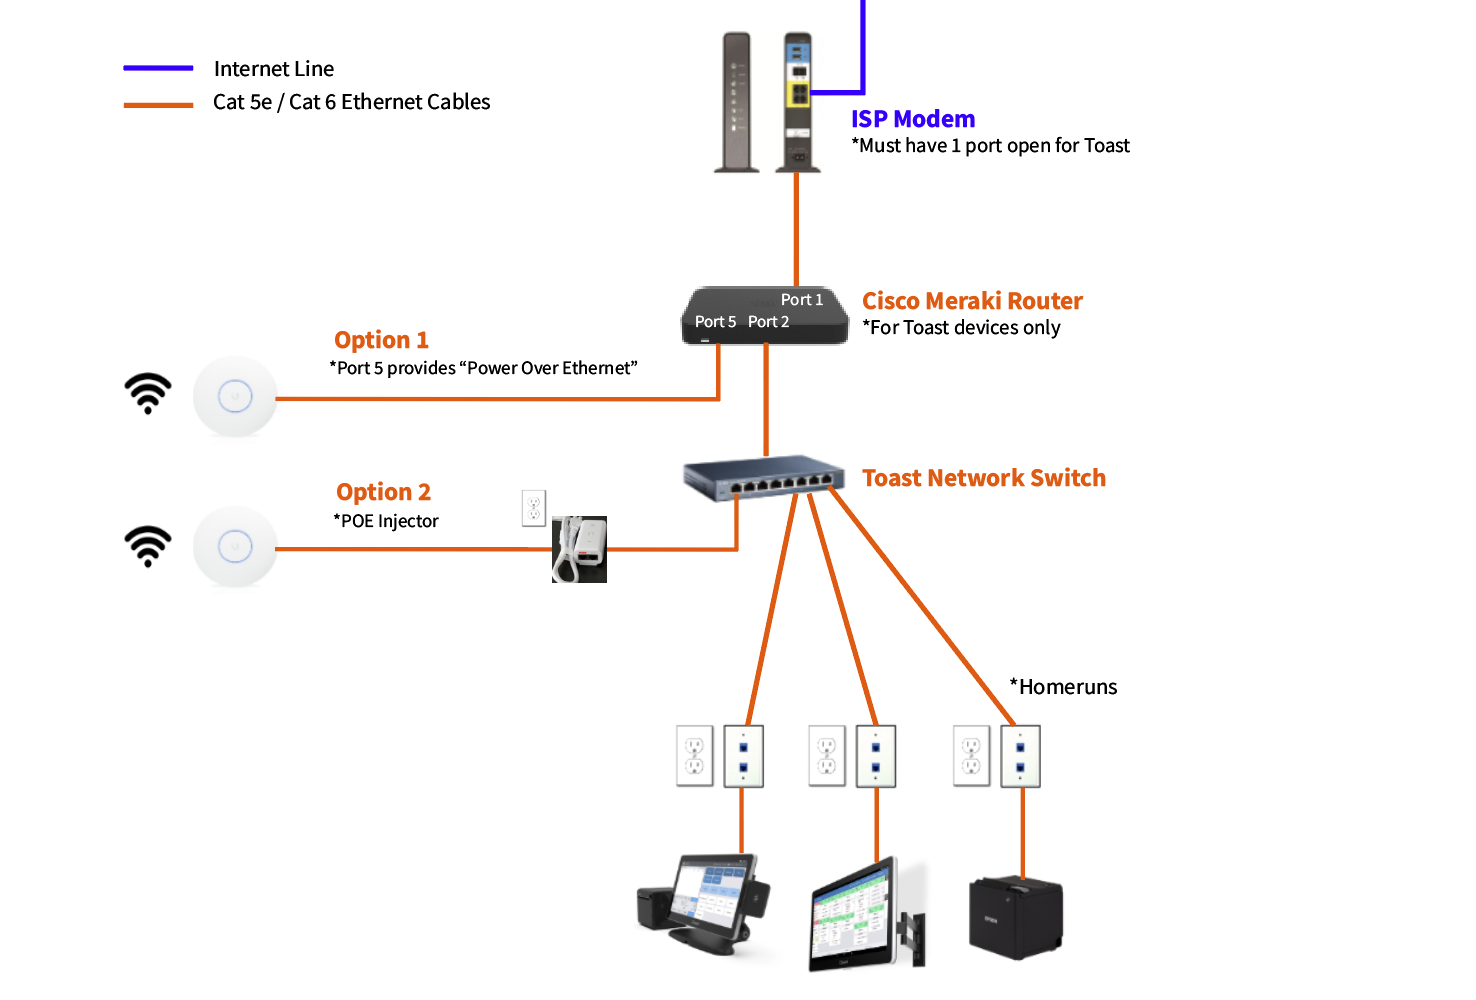
Here is another example referencing specific equipment:
Back to top
Licensing and Security Considerations for Toast Networking
Security for Toast Networking
We recommend only connecting devices purchased from Toast to your Toast-managed network. All unauthorized hard-wired devices should be connected to a different port on your ISP modem rather than be attached to your Toast-provided router or network switch. For more information, see Toast Device & Network Security.
Back to top
Licensing for Toast Networking
- Meraki Routers: Once a Meraki router has been issued to your restaurant, you're initially granted a three-year Meraki cloud license. After three years, these licenses are renewed yearly, and these annual fees are automatically charged.
- Toast Routers: Toast Routers do not currently have additional licensing fees.
Back to top
Select Your Router for Next Steps
The following steps for setup will depend on your router type. Select your router below to continue the installation:
Additional Resources

