Interested in adding a Toast Flex for Kitchen to your Toast Suite? Navigate to Toast Shop now!
Seamlessly connect your front of house with back of house and improve accuracy with one screen to manage orders in real-time.
Toast hardware was developed to withstand the most demanding restaurant conditions - spills, grease, and heat. With Toast Flex for Kitchen, you can rest assured your kitchen is running at full speed. Use this guide to install your Toast Flex for Kitchen. Looking for
In this Article:
Before you get started, identify where you want your Toast Flex for Kitchen to be located. Make sure there is a power outlet and wall port in reach.
Next, make sure your current counter space is cleared and wiped down. Unplug your current KDS hardware and remove it from the counter so your counter space is completely clear.
- Unpack your Toast Flex for Kitchen terminal and place it on your counter.
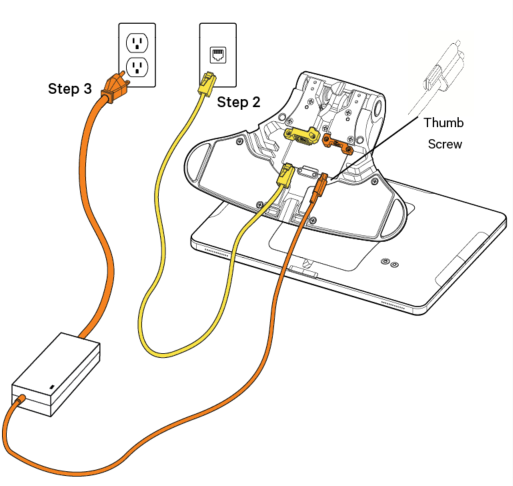
- Remove the yellow box labeled "Connect." This box contains two yellow ethernet cables. One cord is 3 feet and one is 7 feet. Choose the cord length that best suits your restaurant and connect it from the wall to the yellow port labeled "Internet IN" on the base of the terminal stand.
- Remove the orange power box labeled "Power." Plug in the power adapter from the wall into the orange port located at the base of the Toast Flex terminal stand. Use the thumb screw to secure it.
- Log into your restaurant in the Toast App and then power cycle the device. Press the power button on the bottom of your device for 10-15 seconds.
- Select Power Off, then select Ok when prompted. Then, press the power button again to turn the device back on.
- Log into your restaurant in the Toast app once more and complete basic setup. Complete the basic setup for your device and its accessories on-screen.
Product Information:
Dimensions (Low Mode): 14” L x 8.6” W x 6.5" H
Dimensions (High Mode): 14” L x 8.6” W x 10" H
14” Flip Screen with G-Sensor, Full High Definition LCD & Touch Screen
Durability: IP54 rated for dust and water resistance
Back to top
Before you get started, identify where you want your Toast Flex for Kitchen to be located. Make sure there is a power outlet and wall port in reach.
- Unpack your Toast Flex for the Kitchen and wall mount.
- The swing arm for the wall mount will already be attached.
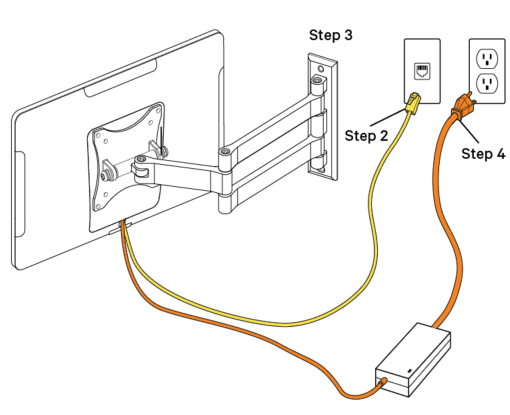
- The power cable and internet cable will be pre-plugged into your Toast Flex for Kitchen.
- Plug the other end of the internet cable into the wall port.
- Attach your wall mount to the wall. Note: Toast does not drill holes. You'll need to drill your own holes or have holes pre-drilled in the desired location.
- Plug the other end of the power cable into the wall outlet.
- Log in to your restaurant in the Toast app and then power cycle the device. Press the power button on the bottom of your device for 10-15 seconds.
- Select Power Off, then select Ok when prompted. Then, press the power button again to turn the device back on.
- Log in to your restaurant in the Toast app once more and complete basic setup. Complete the basic setup for your device and its accessories on-screen.
Product Information:
(Low Mode): 14” L x 8.6” W x 6.5" H
(High Mode): 14” L x 8.6” W x 10" H
14” Flip Screen with G-Sensor, Full High Definition LCD & Touch Screen
Durability: IP54 rated for dust and water resistance
Back to top

