Welcome to your Toast Tap™ (On-Counter) hardware! Follow these steps to learn about this reader, the best way to install it with your hardware, as well as the ins-and-outs of configuration.
Interested in adding a Toast Tap™ card reader to your restaurant? Navigate to Toast Shop now!
Note: Your Toast Tap™ can only be paired up with a swipe-only reader (also known as an MSR reader). All other card readers cannot be used with the Toast Tap™. Learn more about how to set up dual card readers below.
Here's a breakdown of your new hardware. The image below explains each light and both ways to insert or swipe cards.
- Reader ready
- Processing
- Success
- Error
- Insert chip cards with chip facing up
- Swipe with stripe facing up (only for cards without chip or if chip fails)
Back to top
When you receive your Toast Tap™ (On-Counter), you'll get the following:
- The Toast Tap™ (On-Counter) hardware
- The Toast Tap™ (On-Counter) plate with adhesive
- Stickers for your door or windows to advertise accepted payment types
- Counter placement pad for your Toast Tap™
- Tool kit containing a screwdriver, alcohol wipes, and extra adhesives
- Micro-USB to Micro-USB cable
- USB-A to Micro-USB cable
Back to top
To learn how to install your On-Counter Toast Tap™ watch the following video or read the steps below.
- Assess your counter space and card reader setup. Start by looking at your current hardware setup. Are you using a card reader that takes dip payments (aka an EMV reader)?
- If you have an existing EMV card reader, physically remove it before installation.
- Next, wipe down the countertop with the alcohol wipe provided in your tool kit. This will make it even easier for your Toast Tap™ (On-Counter) to adhere properly.
- Pick your cable for installation. Begin by determining the cable you'll use to plug in your Toast Tap™ hardware. You'll only use one of these cables:
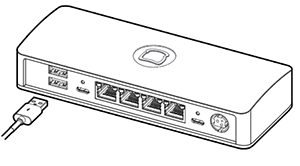
- USB-A to Micro-USB cable: Use this cable if you have an available port open on your Toast Hub, third-party USB hub, or Toast Printer. This cable plugs into the USB port on any of these devices. See installation instructions for the USB-A to Micro-USB cable further down in this article.

- Micro-USB to Micro-USB cable: Use this cable if you don't have an available port or if you only have a terminal. This cable with the plate attached plugs into the side of your terminal and is adhered with screws. See installation instructions for the Micro-USB to Micro-USB cable further down in this article.

Back to top
- Take the USB-A end of the cable and plug it into our Toast Hub or third-party USB hub (first image) or plug the USB-A end of the cable into your Toast Printer (second image).
 OR
OR 
- Plug the remaining Micro-USB end into the bottom of the Toast Tap™ (On-Counter). The end of this cable is marker "to reader."

- You'll see a blinking blue light on your Toast Tap™ to signify that the cable is plugged in all the way.
- Next, you'll need to configure the reader. Scroll down to the configuration section to learn more.
- Remove the plate covering the port on the side of your terminal. Any of the three ports (left, right, or on top) will work.

- Plug in the end of the Micro-USB cable that has the plate attached. Then screw the plate into the terminal.

- If your terminal stand has a neck to hide the cable, feed it through for a cleaner look.
- Plug the other end into the bottom of the Toast Tap™ (On-Counter). This end of the cable is marker "to reader."

- You'll see a blinking blue light on your Toast Tap™ to signify that the cable is plugged in all the way.
- Next, you'll need to configure the reader. Scroll down to the configuration section to learn more.
Back to top
Your Toast Tap™ will auto-detect once it's plugged into your Toast system. You'll need to enable EMV for the ability to take chip and contactless payments.
- Once the Toast Tap™ has been properly plugged into your Toast hardware, restart your terminal.
- From the main menu of the Toast app, navigate to Setup > Device Setup.

- Scroll down and select the option for EMV Enabled.

- Make sure this is set to Yes.
- You'll also see an option for Card Readers below the EMV settings. Your new Toast Tap™ device is listed as BBPOS Chipper 2X(USB)
- Confirm this is listed. you may also be prompted to update the reader's software. If so, opt into the update. Note: Switching out readers automatically turns the EMV setting off. Even if you've already enabled it, EMV will need to be turned on again.
- If you have a second screen attached to your terminal - also known as a Toast Flex for Guest or a Guest-Facing Display - you may have an additional swipe-only card reader. If you have this, make sure the BBPOS Chipper 2X(USB) reader is set to Guest Pay.
Back to top
When setting up your Toast Tap™ (On-Counter), you may have a second screen attached to your terminal - also known as a Toast Flex for Guest or Guest-Facing Display. If so, you have the ability to utilize two card readers at once. For instructions, check out this Toast Central article: Guest Pay and Dual Reader Functionality with Toast Tap™.
Back to top
- Wrap any excess cable length around the inside of your Toast Tap™ in a clockwise motion to reduce wire clutter.
- Apply the plate to your counter surface with the adhesive to anchor your Toast Tap™. Keep in mind this adhesive is strong, so plan your anchoring spot wisely!
- Firmly press the plate down with the adhesive and hold for six seconds. The "Insert" side should face toward your guests.
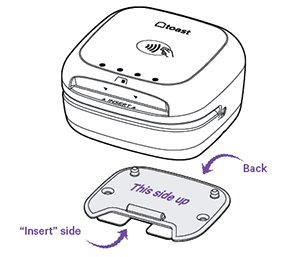
- Place the reader on the plate. It can be removed if needed.
Cards can be:
- Tapped on the top of the reader
- Dipped into the front slot with the card chip facing up
- Swiped across in any direction with the card stripe facing upwards (only used when tap or chip fails or a card is not enabled with a chip)
It's important to note that you'll need to reconfigure your manager swipe cards if you'd like to use them with Toast Tap™. Check out the article Manage Employee/Manager Swipe Cards to learn how to do this.
If you'd like to check out the installation instructional booklet, you can see it here.
Have troubleshooting questions? Check out Get Help with Card Readers.
Back to top

