In this Article:
Menu item tags allow you to filter your product mix based on a quick view of independently grouped items. You're able to create customized menu reports based on these item tags, and can examine the data for common themes to help adjust your menu to increase profit and choose menu items with better care. For example, you might want to tag vegan items or seasonal specials to look at sales trends. You might want to use item tags to keep track of menu items with expensive ingredients (chicken, steak, fish, cheese, guacamole, for example) and see how sales are trending at your restaurant.
Back to top
To get started with utilizing menu item tags, follow these steps:
- In Toast Web, navigate to the Menus > Settings > Item tags.
- Select + Add to create a new item tag.
- Enter a Tag Name. Repeat steps 2-3 as needed.
- If desired, select Order at the bottom of the Item Tags table to rearrange the tags you've created.
- Save and publish your changes.
The Use Count column will show how many items have a particular tag added to them.
Back to top
| In order to add, connect, and/or remove item tags from menu items, a user must have the 4.5 Edit Full Menu access permission. Learn more about user access permissions here, Permissions Reference Guide. |
To connect the tags to menu items:
- Navigate to Menus > Bulk management > Advanced properties.
- Use the caret (arrow) icons on the left side of the table to expand your menus, groups, and subgroups as needed to find the item you'd like to add a tag to.
- Select the name of the menu item to open the item details page.
- Scroll down to the Properties section and select Add Existing Tags next to the Tags setting.
- A new screen will pop up with the tags you've configured. Select one more more tags you'd like to add to this menu item. The pop-up window will show you any other items that are using the same tag. You can select the X button to remove a selected item tag.

- Select Done when you're finished adding tags.
- Save and publish your changes.
Back to top
Item Tags on Toast Mobile Order & Pay®
Toast Mobile Order & Pay® now supports a unique set of item tags. Toast will display the following tags to guests: Gluten Free, Vegan, Vegetarian, and Spicy. When adding these item tags in Toast Web, ensure they match the exact spelling and capitalization as written above, or they will not be displayed to guests on Toast Mobile Order & Pay®.
Back to top
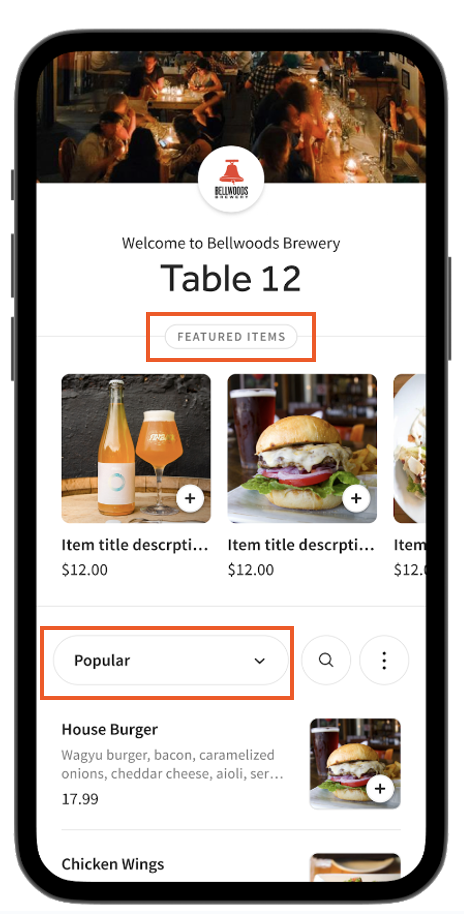
Enable Popular and Featured Menu Items
- Popular items display your most popular items based on your sales history and present them as a menu category.
- Featured items are a special menu with enlarged images to drive more orders. Featured items are customizable.
- To enable or disable Poplar Items and Featured items, log in to Toast Web and navigate to Front of house > Mobile dining solutions > Toast Mobile Order & Pay® > Menus.
- Scroll down to Popular and Featured Items. Here, you can toggle each feature On or Off.
- Save and publish your changes.
To feature items, add Featured as an item tag to up to five items with images in Toast Web following the steps above. Please note that featured items require images. If no items are manually featured, Toast’s algorithm automatically features the most profitable items with images based on price and popularity. Popular menu items can be filtered via the drop-down menu.
Back to top
Menu Item Tags on Online Ordering
Display important menu information on online ordering menu items, such as dietary preferences, limited-time specials, and/or age-restricted menu items. You can select up to two free-form text menu item tags. The tags available will be based on what is currently in place for each menu item. See Create Menu Item Tags and Add Menu Item Tags in this article for more information.
Once your menu item tags are in place, follow the steps below:
- Log in to Toast Web and navigate to Websites > Edit Site (button) > Configure site-wide modules.
- Select Menu > Menu Management > Show item tags.
- From here, you and select the available menu items to tag.

- Publish your changes.
Once published, guests will see your selected menu item tags on your online ordering website.

Once your menu item tags are all set up, you can begin examining trends in menu items ordered by customers. You can also track contests or promotions you've set up.
- In Toast Web, navigate to Menus > Reports > Product mix.
- To filter the report, select the More drop-down list, check the box for Item Tags, and then select Update.
- Once you select item tags, a new drop-down list will appear. Select the tag you'd like to view, and then select Update.

Once updated, your product mix will show only the items relevant to the indicated menu item tag. You'll want to look out for the Item Qty column. It will tell you how many items in each menu group for the selected item tag were sold within the time period indicated. So, how is this information helpful? Well, to maximize profits and deliver menu items that your customers are happiest with, you need to keep a consistent eye on what items are selling best and when. Examine these trends over time to readjust your menu accordingly. If you'd like to look at broader reports (all food items, for example), you can learn more in Menu Reports Overview.
This four-minute video will give you actionable tips and tricks from Toast POS to enhance your menu's performance.
Back to top

