In this Article:
Two-Level Fulfillment Overview
Two level fulfillment allows you to to track and fulfill orders once at the prep station when they've been prepared, and again on your expediter screen when the prepared items have been delivered to a table or customer. This requires configuration in both Toast Web and within Device Setup on your KDS.
Back to top
To enable this feature, follow these steps:
- In Toast Web, navigate to Kitchen > Printers, tickets, & KDS devices > Kitchen.
- Scroll to the Expediter settings section, and for the Two-Level Fulfillment setting, select Two levels.
- Note: For more information on the Sequenced Expediter Fulfillment setting that appears when you select two-level fulfillment, read the Require Fulfillment per Expediter section of this article.
- Save and publish your changes.
Back to top
The settings described below can all be changed in the future by navigating to the Device Setup menu. To get set up your new KDS screen, follow these steps from the initial login workflow:
- When you're asked to determine what screen your employees should see first, select Kitchen Display/Expo Screen.
- Select Save.
- The next screen asks you how you'd like to fulfill tickets on this kitchen display. Choose Expediter to allow this device to fulfill tickets for all prep stations.
- Select Save.
- Name this device appropriately and select Save.
- Now you'll choose whether this is a first-level or second-level device.
- First - most likely the kitchen staff will use this device at a "final" prep or expo station to say the order is complete.
- Second - most likely an expediter or food runner will use this device to fulfill tickets when guests receive their order.
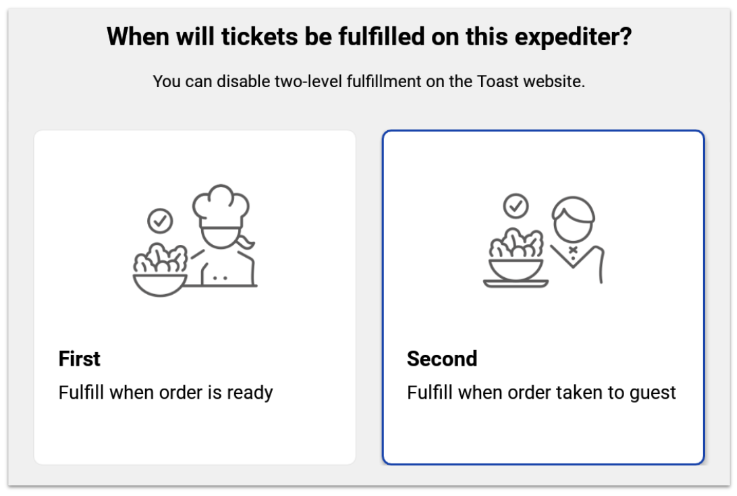
- Select Save.
- Lastly, select if you'd like to use the double tap method for fulfilling or unfulfilling kitchen tickets and select Save.
- The final screen will indicate that you're finished. Complete this entire process for each new KDS screen to form the first and second levels of fulfillment.
Back to top
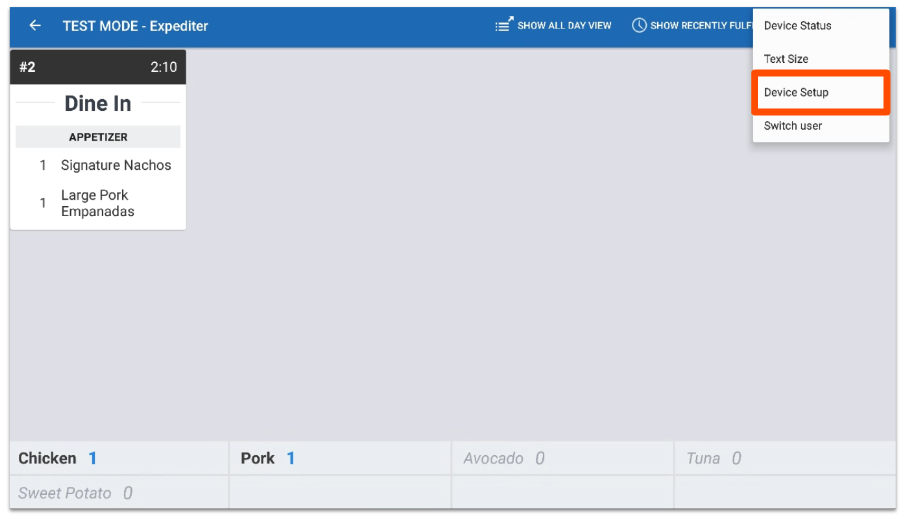
- Select the back button (left-facing arrow) in the upper left corner of your KDS screen until you see the device menu. In the Setup section, select Device Setup.
- Scroll down to the Kitchen Setup section and locate the Two-Level Fulfillment setting (remember, this must be an expediter KDS in order to use two-level fulfillment). Select the Two-Level Fulfillment setting to make a change.
- Now you'll choose whether this is a first-level or second-level device.
- First - most likely the kitchen staff will use this device at a "final" prep or expo station to say the order is complete.
- Second - most likely an expediter or food runner will use this device to fulfill tickets when guests receive their order.
- Select Save, and then tap the arrow in the top-left corner to return to your kitchen display screen.
If you have multiple expediter screens, you can require tickets to get fulfilled on one screen before being able to fulfill from another. This feature can be used to limit food runners from fulfilling a ticket preemptively. By default, this feature will be automatically turned off. If you'd like to enable it, use the following steps:
- In Toast Web, navigate to Kitchen > Printers, tickets, & KDS devices > Kitchen.
- Scroll down to the Expediter section. When the Two levels option is selected for the Two-Level Fulfillment setting, you'll also see a Sequenced Expediter Fulfillment setting show up right underneath it.
- If you select the checkbox for this setting, you'll require tickets to be fulfilled at Expediter-1 (first level) before they can be fulfilled at Expediter-2 (second level).
- Save and publish any changes.
When this setting is enabled, if you try to fulfill an order at Expediter 2 before the Expediter 1 has been fulfilled, you will receive an error pop-up preventing you from proceeding until Expediter 1 has been fulfilled. This pop-up can be overridden by a manager passcode or swipe if necessary.
Back to top
Note: This setup is device-specific and will only affect the tickets shown on the chosen expediter screen.
- To filter tickets on the expediter screen based on dining options, navigate to Device Setup by selecting the three dots (overflow menu) in the top-right corner of the screen.
- Scroll down to the Kitchen Setup section and select Ticket Display Options.
- From here, select the Dining Options that you'd like to display on the kitchen display screen. Note: If no dining options are selected on this list, then all of the options will be displayed on the device.
- Once your desired dining options have been selected, select Continue.
- Select the back arrow in the top-left corner of the screen to return to your kitchen display screen.
Back to top

